Welcome back! This post will build on the previous posts in this series by deploying a Windows Server 2019 bastion host to manage our Google Cloud VMware Engine (GCVE) SDDC. Access to the bastion host will be provided with Identity-Aware Proxy (IAP). Everything will be deployed and configured with Terraform, with all of the code referenced in this post is available at https://github.com/shamsway/gcp-terraform-examples in the gcve-bastion-iap sub-directory.
Other posts in this series:
- Deploying a GCVE SDDC with HCX
- Connecting a VPC to GCVE
- Network and Connectivity Overview
- HCX Configuration
- Common Networking Scenarios
Identity Aware Proxy Overview
Standing up initial cloud connectivity is challenging. I walked through the steps to deploy a client VPN in Deploying a GCVE SDDC with HCX, but this post will show how to use IAP as a method for accessing a new bastion host. Using IAP means that the bastion host will be accessible without having to configure a VPN or expose it to the internet. I am a massive fan of this approach, and while there are some tradeoffs to discuss, it is a simpler and more secure approach than traditional access methods.
IAP can be used to access various resources, including App Engine and GKE. Accessing the bastion host over RDP (TCP port 3389) will be accomplished using IAP for TCP forwarding. Once configured, IAP will allow us to establish a connection to our bastion host over an encrypted tunnel on demand. Configuring this feature will require some specific IAM roles, as well as some firewall rules in your VPC. If you have Owner permissions in your GCP project, then you’re good to go. Otherwise, you will need the following roles assigned to complete the tasks outlined in the rest of this post:
- Compute Admin (
roles/compute.admin) - Service Account Admin (
roles/iam.serviceAccountAdmin) - Service Account User (
roles/iam.serviceAccountUser) - IAP Policy Admin (
roles/iap.admin) - IAP settings Admin (
roles/iap.settingsAdmin) - IAP-secured Tunnel User (
roles/iap.tunnelResourceAccessor) - Service Networking Admin (
roles/servicenetworking.networksAdmin) - Project IAM Admin (
roles/resourcemanager.projectIamAdmin)
The VPC firewall will need to allow traffic sourced from 35.235.240.0/20, which is the range that IAP uses for TCP forwarding. This rule can be further limited to specific TCP ports, like 3389 for RDP or 22 for SSH.
Bastion Host Deployment with Terraform
The example Terraform code linked at the beginning of the post will do the following:
- Create a service account, which will be associated with the bastion host
- Create Windows 2019 Server instance, which will be used as a bastion host
- Create firewall rules for accessing the bastion host via IAP, and accessing resources from the bastion host
- Assign IAM roles needed for IAP
- Set a password on the bastion host using the
gcloudtool
After Terraform completes configuration, you will be able to use the gcloud tool to enable TCP forwarding for RDP. Once connected to the bastion host, you will be able to log into your GCVE-based vSphere portal. To get started, clone the example repo with git clone https://github.com/shamsway/gcp-terraform-examples.git, then change to the gcve-bastion-iap sub-directory. You will find these files:
main.tf– Contains the primary Terraform code to complete the steps mentioned abovevariables.tf– Defines the input variables that will be used inmain.tfterraform.tfvars– Supplies values for the input variables defined invariables.tfoutputs.tf– Defines the output variables to be returned frommain.tf
Let’s take a closer look at what is happening in each of these files.
main.tf Contents
provider "google" {
  project = var.project
  region  = var.region
  zone    = var.zone
}

data "google_compute_network" "network" {
  name = var.network_name
}

data "google_compute_subnetwork" "subnet" {
  name   = var.subnet_name
  region = var.region
}
Just like the example from my last post, main.tf begins with a provider block to define the Google Cloud project, region, and zone in which Terraform will create resources. The following data blocks, google_compute_network.network and google_compute_network.subnet, reference an existing VPC network and subnetwork. These data blocks will provide parameters necessary for creating a bastion host and firewall rules.
resource "google_service_account" "bastion_host" {
  project      = var.project
  account_id   = var.service_account_name
  display_name = "Service Account for Bastion"
}
The first resource block creates a new service account that will be associated with our bastion host instance.
resource "google_compute_instance" "bastion_host" {
  name         = var.name
  machine_type = var.machine_type

  boot_disk {
    initialize_params {
      image = var.image
    }
  }

  network_interface {
    subnetwork = data.google_compute_subnetwork.subnet.self_link
    access_config {}
  }

  service_account {
    email  = google_service_account.bastion_host.email
    scopes = var.scopes
  }

  tags   = [var.tag]
  labels = var.labels
  metadata = var.metadata
}
The google_compute_instance.bastion_host block creates the bastion host. There are a few things to take note of in this block. subnetwork is set based on one of the data blocks at the beginning of main.tf, data.google_compute_subnetwork.subnet.self_link. The self_link property provides a unique reference to the subnet that Terraform will use when submitting the API call to create the bastion host. Similarly, the service account created by google_service_account.bastion_host is assigned to the bastion host.
tags, labels, and metadata all serve similar, but distinct, purposes. tags are network tags, which will be used in firewall rules. labels are informational data that can be used for organizational or billing purposes. metadata has numerous uses, the most common of which is supplying a boot script that the instance will run on first boot.
resource "google_compute_firewall" "allow_from_iap_to_bastion" {
  project = var.project
  name    = var.fw_name_allow_iap_to_bastion
  network = data.google_compute_network.network.self_link

  allow {
    protocol = "tcp"
    ports    = ["3389"]
  }

  # https://cloud.google.com/iap/docs/using-tcp-forwarding#before_you_begin
  # This range is needed to allow IAP to access the bastion host
  source_ranges = ["35.235.240.0/20"]

  target_tags = [var.tag]
}

resource "google_compute_firewall" "allow_access_from_bastion" {
  project = var.project
  name    = var.fw_name_allow_mgmt_from_bastion
  network = data.google_compute_network.network.self_link

  allow {
    protocol = "icmp"
  }

  allow {
    protocol = "tcp"
    ports    = ["22", "80", "443", "3389"]
  }

  # Allow management traffic from bastion
  source_tags = [var.tag]
}
The next two blocks create firewall rules: one for accessing the bastion host via IAP, and the other for accessing resources from the bastion host. google_compute_firewall.allow_from_iap_to_bastion allows traffic from 35.235.240.0/24 on tcp/3389 to instances that have the same network tag as the one that was assigned to the bastion host. google_compute_firewall.allow_access_from_bastion allows traffic from the bastion host by referencing the same network tag to anything else in our project, using common management ports/protocols.
resource "google_iap_tunnel_instance_iam_binding" "enable_iap" {
  project    = var.project
  zone       = var.zone
  instance   = var.name
  role       = "roles/iap.tunnelResourceAccessor"
  members    = var.members
  depends_on = [google_compute_instance.bastion_host]
}
The google_iap_tunnel_instance_iam_binding.enable_iap block assigns the roles/iap.tunnelResourceAccessor IAM role to the accounts defined in the members variable. This value could be any valid IAM resource like a specific account or a group. This role is required to be able to access the bastion host via IAP.
resource "google_service_account_iam_binding" "bastion_sa_user" {
  service_account_id = google_service_account.bastion_host.id
  role               = "roles/iam.serviceAccountUser"
  members            = var.members
}
The google_project_iam_member.bastion_sa_user block allows accounts specified in the members variable to use the newly created service account via the Service Account User role (roles/iam.serviceAccountUser). This allows the users or groups defined in the members variable to access all of the resources that the service account has rights to access. More information on this can be found here.
resource "google_project_iam_member" "bastion_sa_bindings" {
  for_each = toset(var.service_account_roles)

  project = var.project
  role    = each.key
  member  = "serviceAccount:${google_service_account.bastion_host.email}"
}
google_project_iam_member.bastion_sa_bindings completes the IAM-related configuration by granting roles defined in the service_account_roles variable to the service account. This service account is assigned to the bastion host, which defines what the bastion host can do. The default roles assigned are listed below, but they can be modified in variables.tf.
- Log Writer (
roles/logging.logWriter) - Monitoring Metric Writer (
roles/monitoring.metricWriter) - Monitoring Viewer (
roles/monitoring.viewer) - Compute OS Login (
roles/compute.osLogin)
resource "time_sleep" "wait_60_seconds" {
  create_duration = "60s"
  depends_on      = [google_compute_instance.bastion_host]
}

data "external" "gcloud_set_bastion_password" {
  program    = ["bash", "-c", "gcloud compute reset-windows-password ${var.name} --user=${var.username} --format=json --quiet"]
  depends_on = [time_sleep.wait_60_seconds]
}
These final two blocks are what I refer to as “cool Terraform tricks.” The point of these blocks is to set the password on the bastion host. There are a few ways to do this, but unfortunately, there is no way to set a Windows instance password with a native Terraform resource. Instead, an external data source is used to run the appropriate gcloud command, with JSON formatted results returned (this is a requirement of the external data source.) The password cannot be set until the bastion host is fully booted, so external.gcloud_set_bastion_pasword depends on time_sleep.wait_60_seconds, which is a simple 60-second timer that gives the bastion host time to boot up before the gcloud command is run.
There is a chance that 60 seconds may not be long enough for the bastion host to boot. If you receive an error stating that the instance is not ready for use, you have two options:
- Run
terraform destroyto remove the bastion host. Editmain.tfand increase thecreate_durationto a higher value, then runterraform applyagain. - Run the
gcloud compute reset-windows-passwordcommand manually
Ideally, the password reset functionality would be built into the Google Cloud Terraform provider, and I wouldn’t be surprised to see it added in the future. If you’re reading this post in 2022 or beyond, it’s probably worth a quick investigation to see if this has happened.
output.tf Contents
output "bastion_username" {
  value = data.external.gcloud_set_bastion_password.result.username
}

output "bastion_password" {
  value = data.external.gcloud_set_bastion_password.result.password
}
These two outputs are the results of running the gcloud command. Once Terraform has completed running, it will display the username and password set on the bastion host. A password is sensitive data, so if you want to prevent it from being displayed, add sensitive = true to the bastion_password output block. Output values are stored in the Terraform state file, so you should take precautions to protect the state file from unauthorized access. Additional information on Terraform outputs is available here.
terraform.tfvars Contents
terraform.tfvars is the file that defines all the variables that are referenced in main.tf. All you need to do is supply the desired values for your environment, and you are good to go. Note that the variables below are all examples, so simply copying and pasting may not lead to the desired result.
members              = ["user:[email protected]"]
project              = "your-gcp-project"
region               = "us-west2"
zone                 = "us-west2-a"
service_account_name = "bastion-sa"
name                 = "bastion-vm"
username             = "bastionuser"
labels               = { owner = "GCVE Team", created_with = "terraform" }
image                = "gce-uefi-images/windows-2019"
machine_type         = "n1-standard-1"
network_name         = "gcve-usw2"
subnet_name          = "gcve-usw2-mgmt"
tag                  = "bastion"
Additional information on the variables used is available in README.md. You can also find information on these variables, including their default values should one exist, in variables.tf.
Initializing and Running Terraform
Terraform will use Application Default Credentials to authenticate to Google Cloud. Assuming you have the gcloud cli tool installed, you can set these by running gcloud auth application-default. Additional information on authentication can be found in the Getting Started with the Google Provider Terraform documentation. To run the Terraform code, follow the steps below.
Following these steps will create resources in your Google Cloud project, and you will be billed for them.
- Run
terraform initand ensure no errors are displayed - Run
terraform planand review the changes that Terraform will perform - Run
terraform applyto apply the proposed configuration changes
Should you wish to remove everything created by Terraform, run terraform destroy and answer yes when prompted. This will only remove the VPC network and related configuration created by Terraform. Your GCVE environment will have to be deleted using these instructions, if desired.
Accessing the Bastion Host with IAP
Now, you should have a fresh Windows 2019 Server running in Google Cloud to serve as a bastion host. Use this command to create a tunnel to the bastion host:
gcloud compute start-iap-tunnel [bastion-host-name] 3389 --zone [zone]

You will see a message that says Listening on port [random number]. This random high port is proxied to your bastion host port 3389. Fire up your favorite RDP client and connect to localhost:[random number]. Login with the credentials that were output from running Terraform. Once you’re able to connect to the bastion host, install the vSphere-compatible browser of your choice, along with any other management tools you may need.
If you’re a Windows user, there is an IAP-enabled RDP client available here.
Accessing GCVE Resources from the Bastion Host
Open the GCVE portal, browse to Resources, and click on your SDDC, then vSphere Management Network. This will display the hostnames for your vCenter, NSX and HCX instances. Copy the hostname for vCenter and paste it into a browser in your bastion host to verify you can access your SDDC.
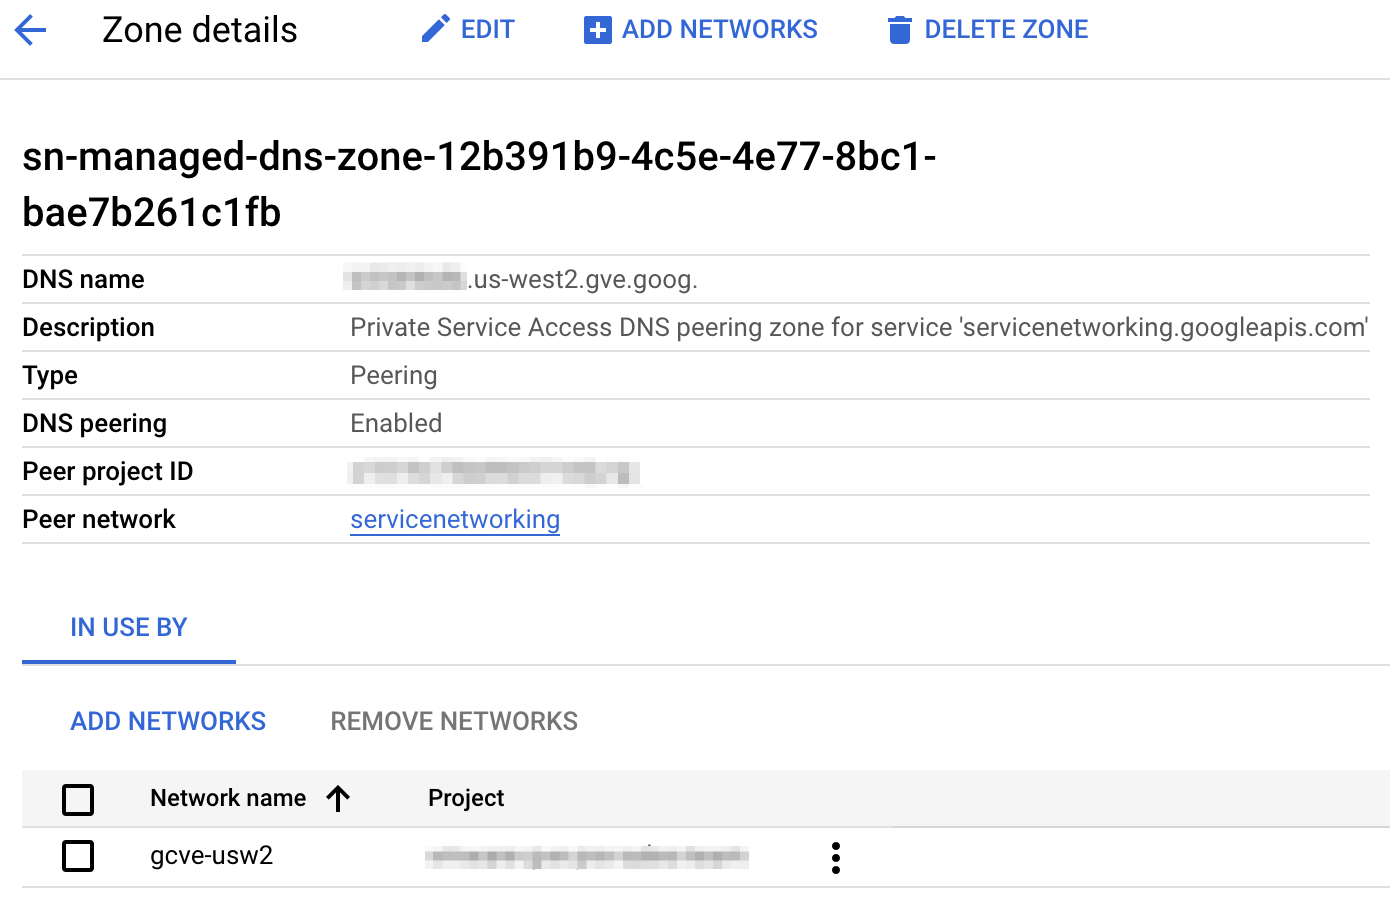 Cloud DNS forwarding config to enable resolution of GCVE resources
Access to GCVE from your VPC is made possible by private service access and a DNS forwarding configuration in Cloud DNS. The DNS forwarding configuration enables name resolution from your VPC for resources in GCVE. It is automatically created in Cloud DNS when private service access is configured between your VPC and GCVE. This is a relatively new feature and a nice improvement. Previously, name resolution for GCVE required manually changing resolvers on your bastion host or configuring a standalone DNS server.
Wrap Up
A quick recap of everything we’ve accomplished if you’ve been following this blog series from the beginning:
- Deployed an SDDC in GCVE
- Created a new VPC and configured private service access to your SDDC
- Deployed a bastion host in your VPC, accessible via IAP
Clearly, we are just getting started! My next post will look at configuring Cloud Interconnect and standing up an HCX service mesh. With that in place, we can begin migrating some workloads into our SDDC.
Terraform Documentation Links
- Google Provider Configuration Reference
- google_compute_network Data Source
- google_compute_subnetwork Data Source
- google_service_account Resource
- google_compute_instance Resource
- google_compute_firewall Resource
- google_iap_tunnel_instance_iam_binding Resource
- google_service_account_iam_binding Resource
- google_project_iam_member Resource
- time_sleep Resource
- external Data Source
Comments are powered by Disqus, which uses cookies.