This post will cover some common networking scenarios in Google Cloud VMware Engine (GCVE), like exposing a VM via public IP, accessing cloud-native services, and configuring a basic load balancer in NSX-T. I’ll also recap some important and useful features in GCP and GCVE. There is a lot of material covered, so I’ve provided a table of contents to allow you to skip to the topic you’re interested in.
Table of Contents
- Creating Workload Segments in NSX-T
- Exposing a VM via Public IP
- Load Balancing with NSX-T
- Accessing Cloud-Native Services
- Viewing Routing Information
- VPN Connectivity
- DNS Notes
- Wrap Up
- Helpful Resources
Other posts in this series:
- Deploying a GCVE SDDC with HCX
- Connecting a VPC to GCVE
- Bastion Host Access with IAP
- Network and Connectivity Overview
- HCX Configuration
Creating Workload Segments in NSX-T
Your GCVE SDDC initially comes with networking pre-configured, and you don’t need to worry about configuring and trunking VLANs. Instead, any new networking configuration will be done in NSX-T. If you are new to NSX-T, the GCVE documentation covers creating new workload segments, which should be your first step before creating or migrating any VMs to your GCVE SDDC.
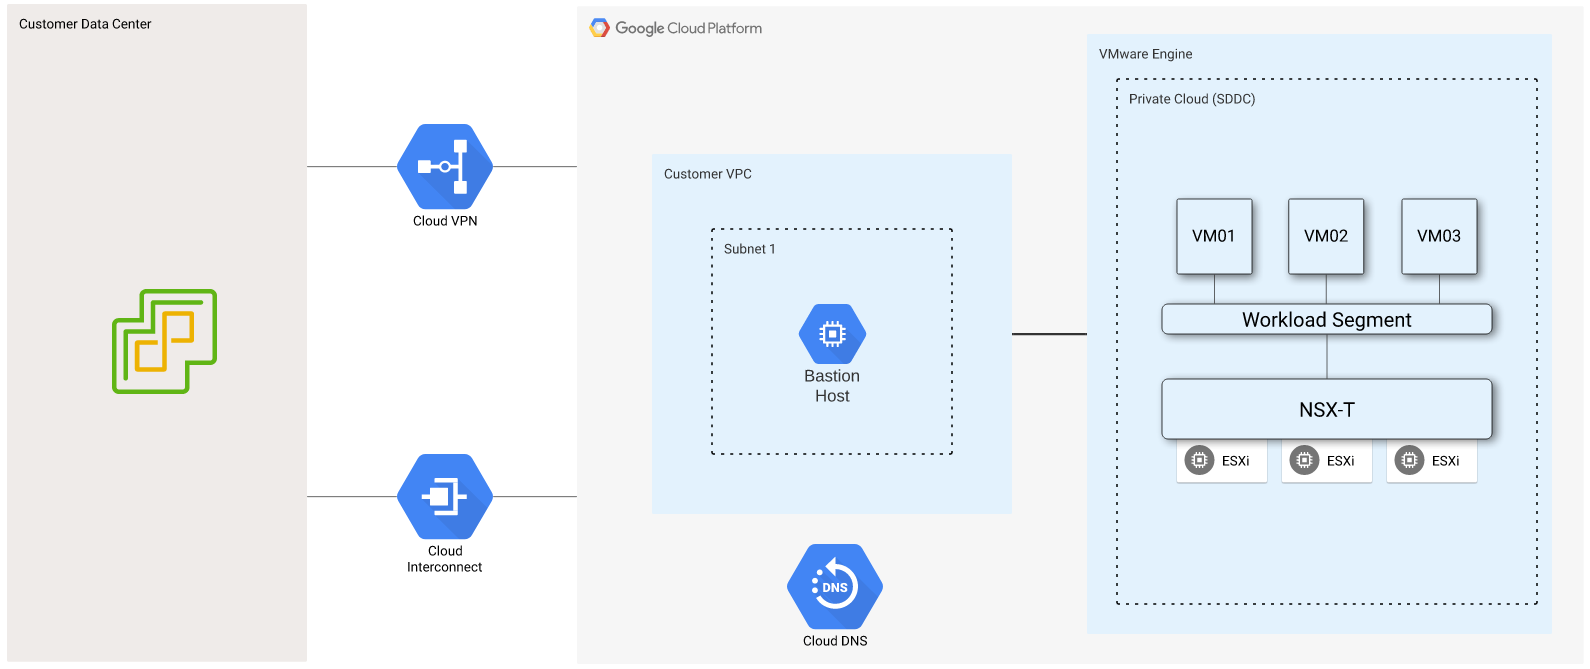
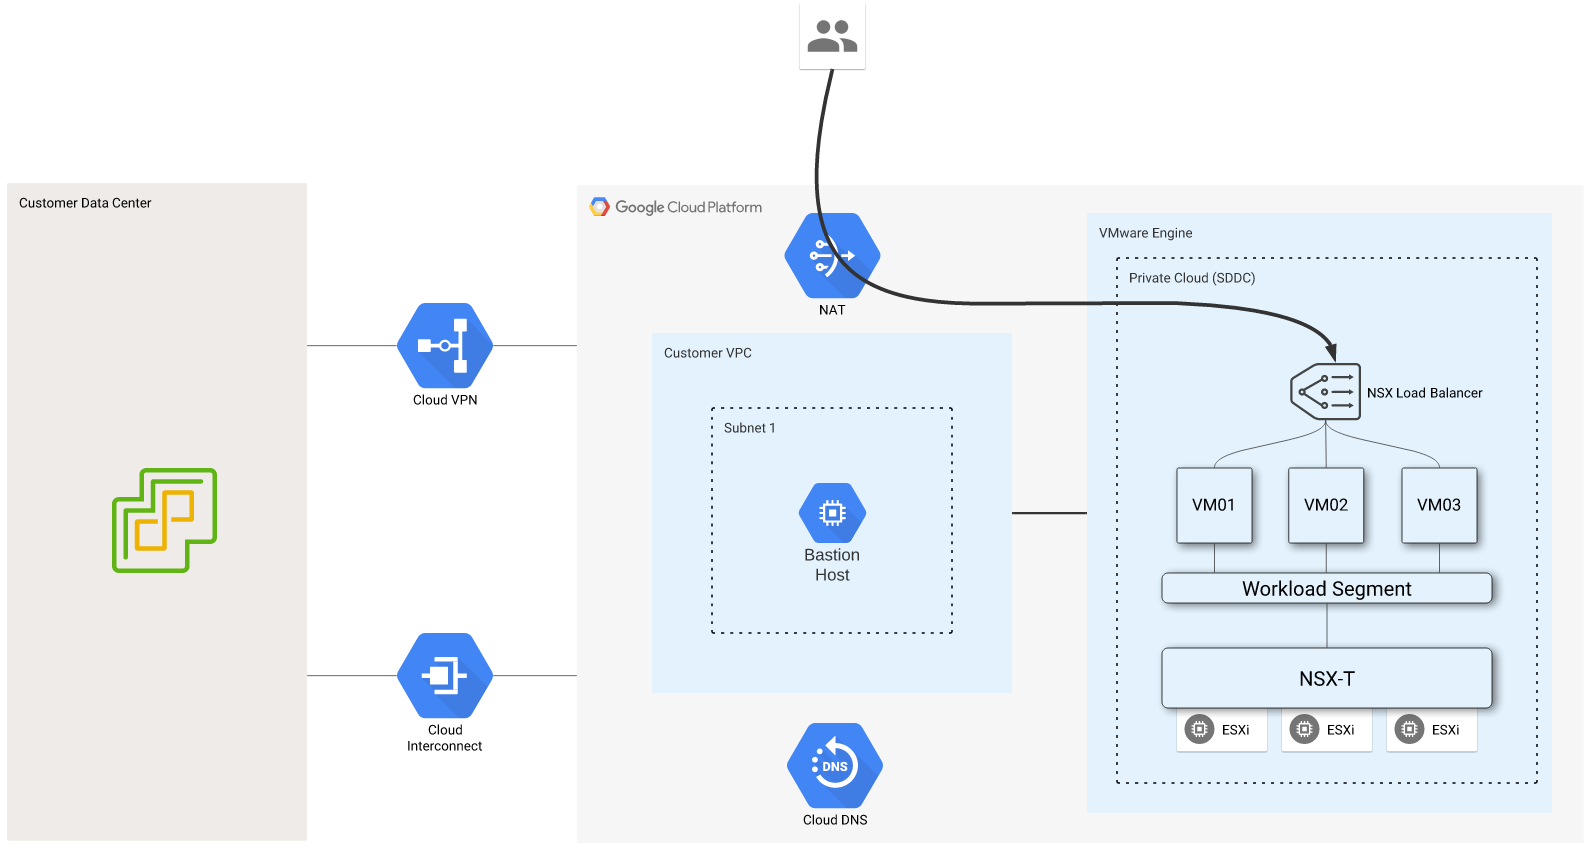
This diagram represents the initial setup of my GCVE environment, and I will be building on this example over the following sections. If you’ve been following along with this blog series, this should look familiar. You can see a “Customer Data Center” on the left, which in my case is a lab, but it could be any environment connected to GCP via Cloud VPN or Cloud Interconnect. There is also a VPC peered with my GCVE environment, which is where my bastion host is running.
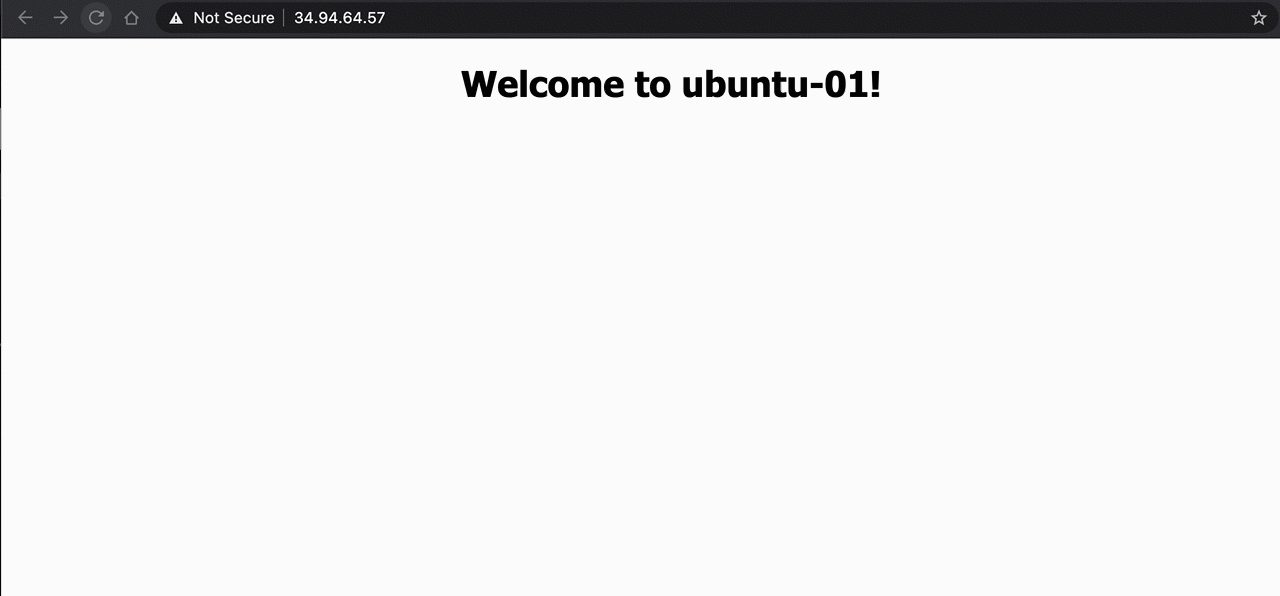
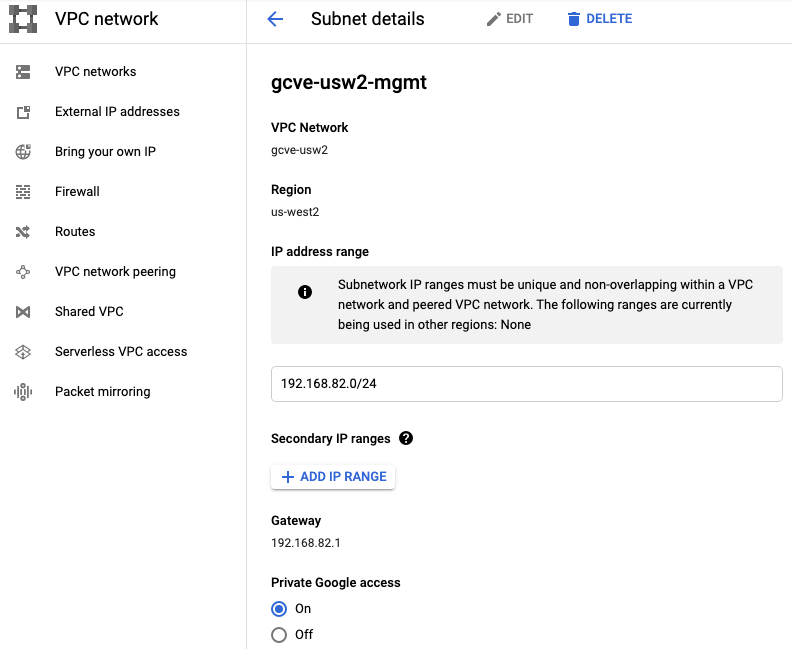
I’ve created a workload segment, 192.168.83.0/24, and connected three Ubuntu Linux VMs to it. A few essential steps must be completed outside of NSX-T when new segments are created while using VPC peering or dynamic routing over Cloud VPN or Cloud Interconnect.

First, you must have Import/export custom routes enabled in private service access for the VPC peered with GCVE. Custom routes are covered in my previous post, Connecting a VPC to GCVE. Notice that my newly created segment shows up under Imported Routes.

Second, any workload segments must be added as a custom IP range to any Cloud Router participating in BGP peering to advertise routes back to your environment. This would apply to both Cloud Interconnect and Cloud VPN, where BGP is used to provide dynamic routing. Configuring this will ensure that the workload subnet will be advertised to your environment. More information can be found here.
NSX-T has an excellent Terraform provider, and I have already covered several GCP Terraform examples in previous posts. My recommendation is to add new NSX-T segments via Terraform and add the custom subnet advertisement for the segment to any Cloud Routers via Terraform in the same workflow. This way, you will be sure you never forget to update your Cloud Router advertisements after adding a new segment.
Exposing a VM via Public IP
Let’s add an application into the mix. I have a test webserver running on VM1 that I want to expose to the internet.
In GCVE, public IPs are not assigned directly to a VM. Instead, public IPs are allocated through the GCVE portal and assigned to the private IP of the relevant VM. This creates a simple destination NAT from the allocated public IP to the internal private IP.

Browse to Network > Public IPs and click Allocate to allocate a public IP. You will be prompted to supply a name and the region for the public IP. Click Submit, and you will be taken back to the Public IPs page. This page will now show the public IP that has been allocated. The internal address it is assigned to is listed under the Attached Address column.
You can find more information on public IPs in the GCVE documentation.
Creating Firewall Rules
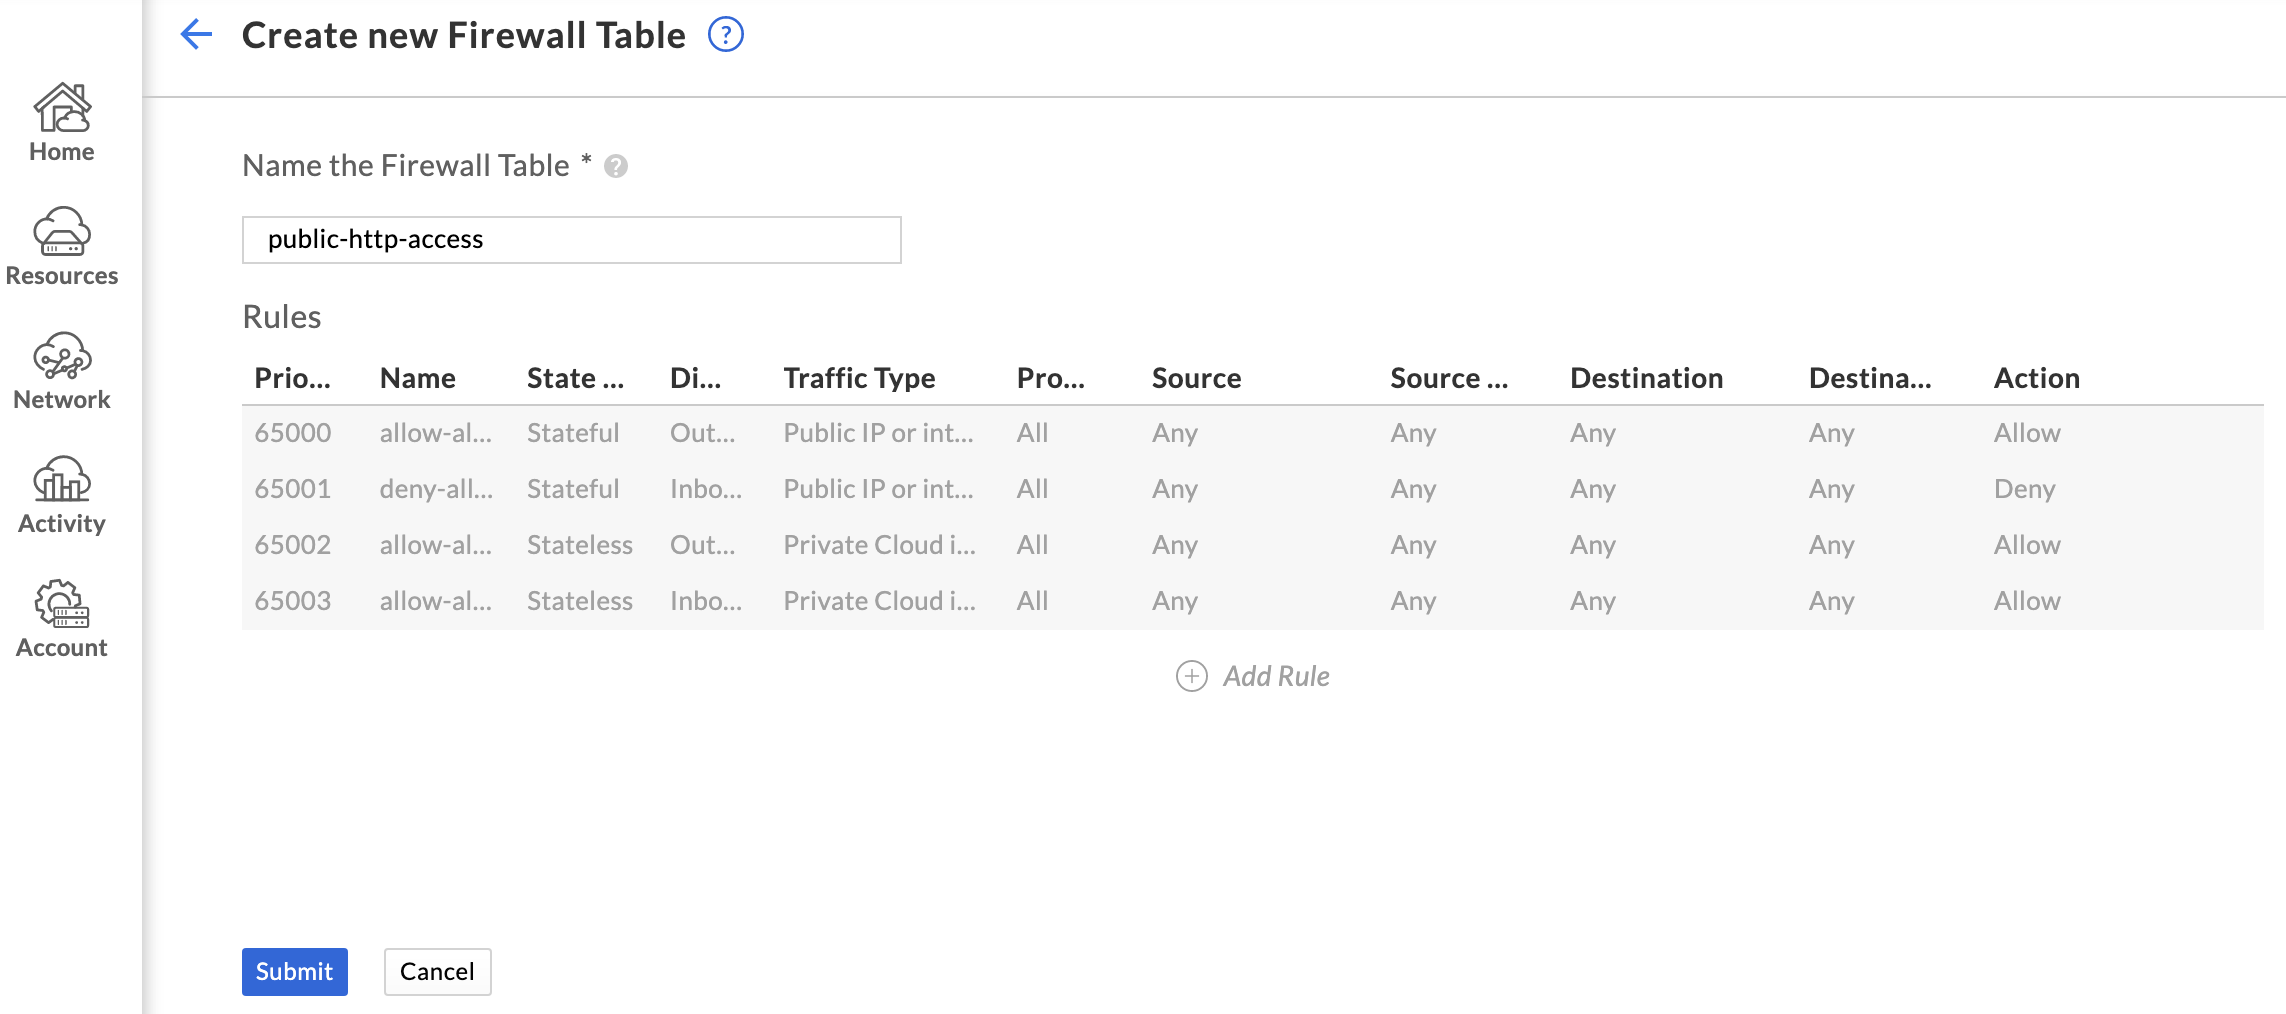
GCVE also includes a firewall beyond the NSX-T boundary, so it will need to be configured to allow access to the public IP that was just allocated. To do this, browse to Network > Firewall tables and click Create new firewall table. Provide a name for the firewall table and click Add Rule.
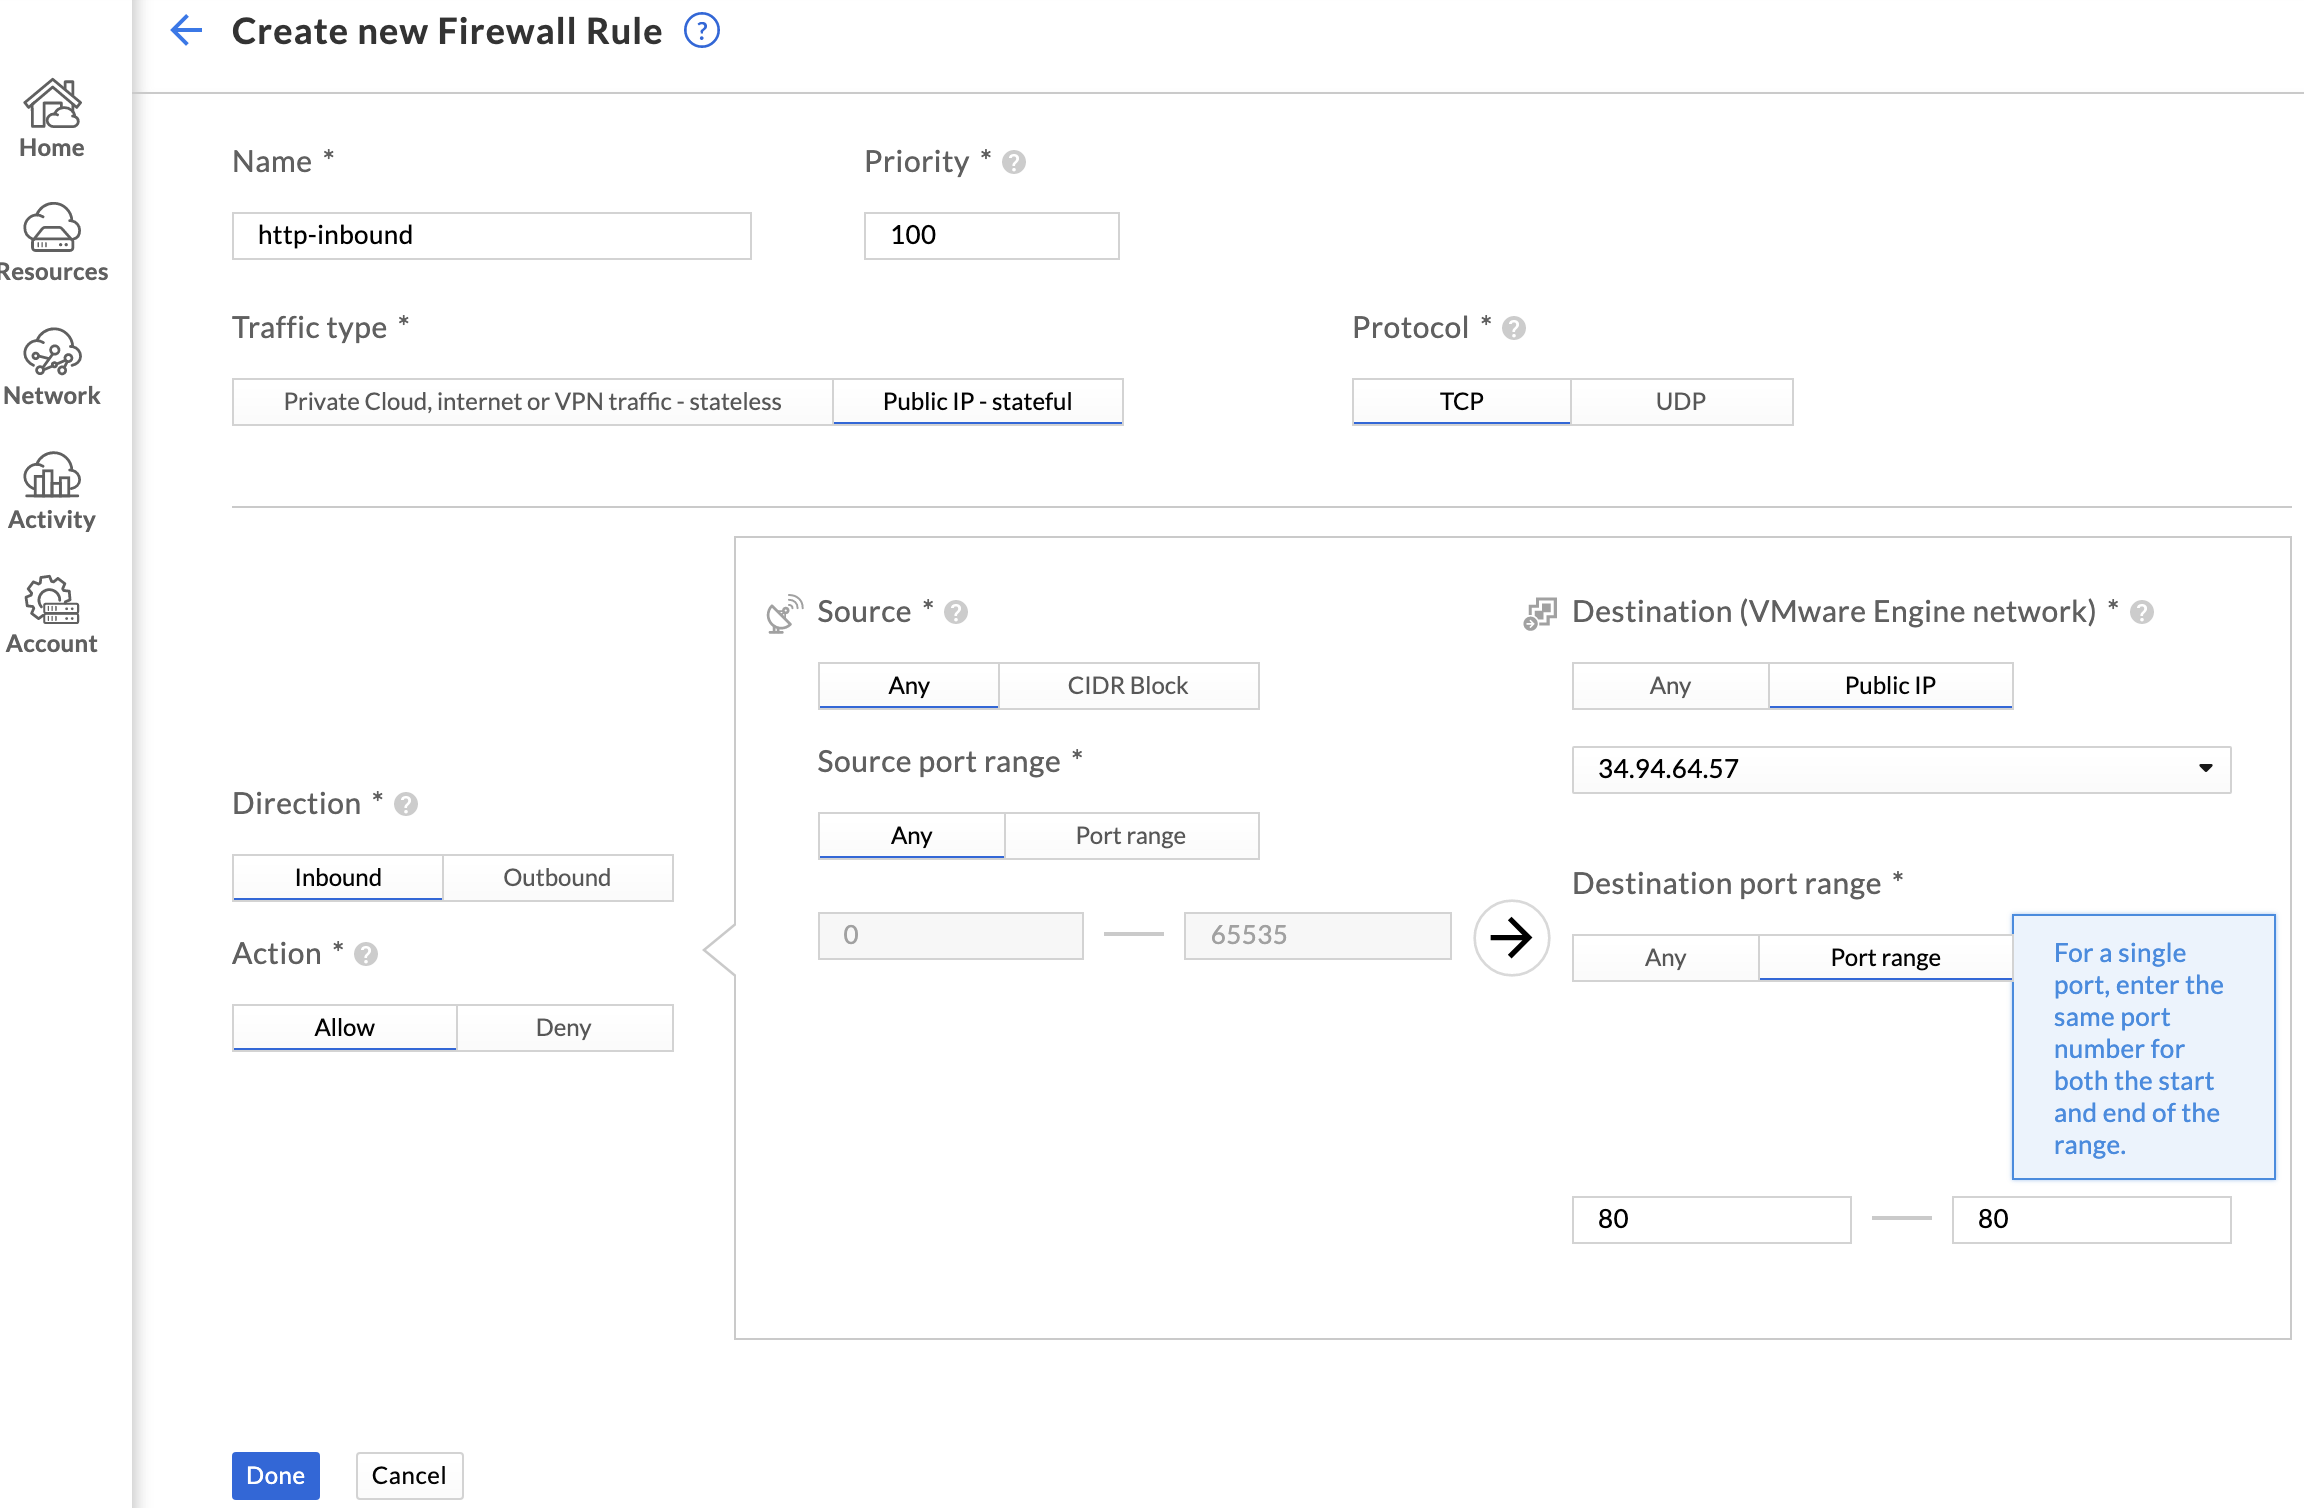
Configure the rule to allow the desired traffic, choosing Public IP as the destination. Choose the newly allocated public IP from the dropdown, and click Done.

The new firewall table will be displayed. Click Attached Subnets, then Attach to a Subnet. This will attach the firewall table to a network.
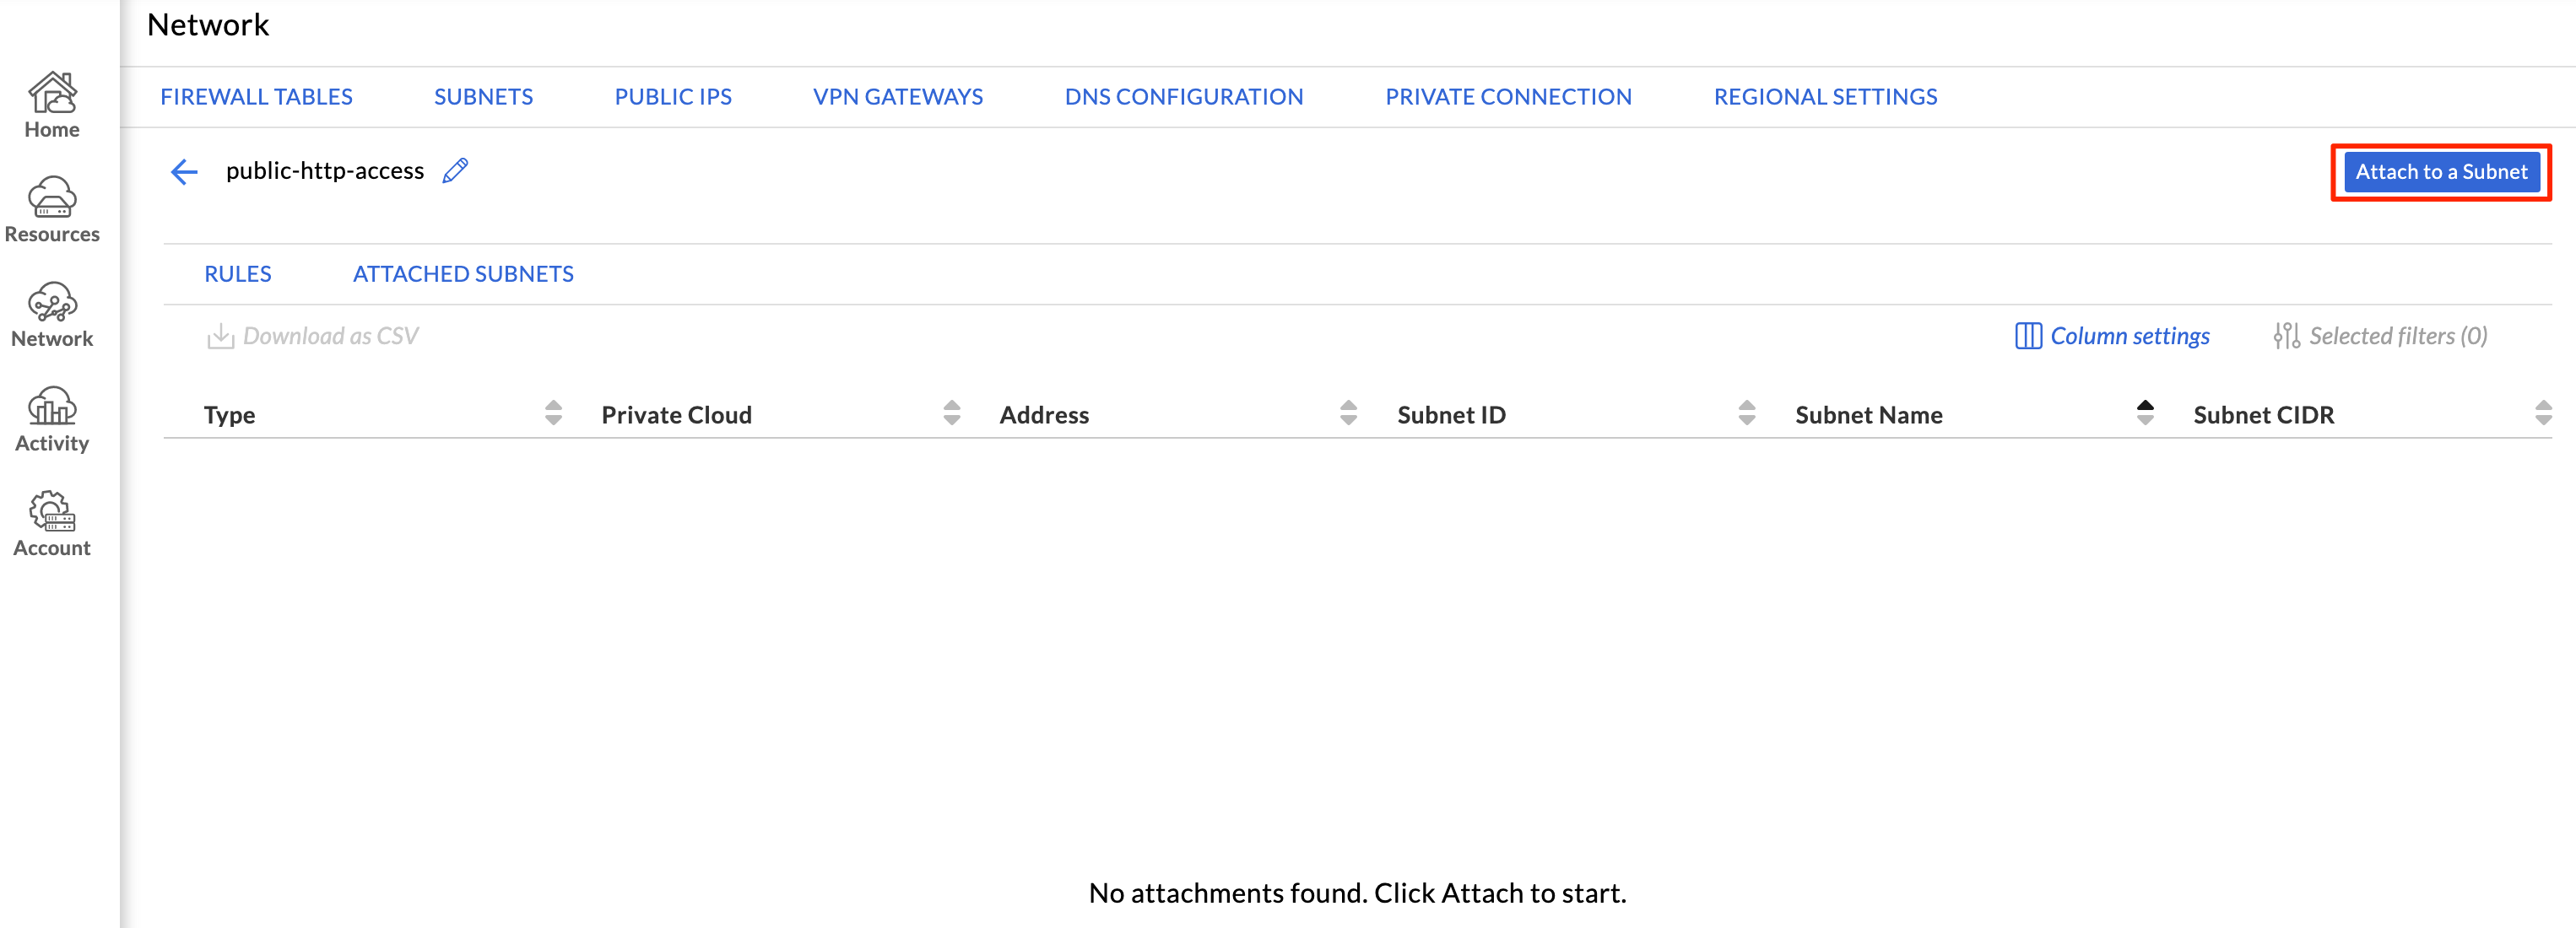
Choose your SDDC along with System management from the Select a Subnet dropdown, and click Save. System management is the correct subnet to use when applying the firewall table to traffic behind NSX-T per the GCVE documentation.
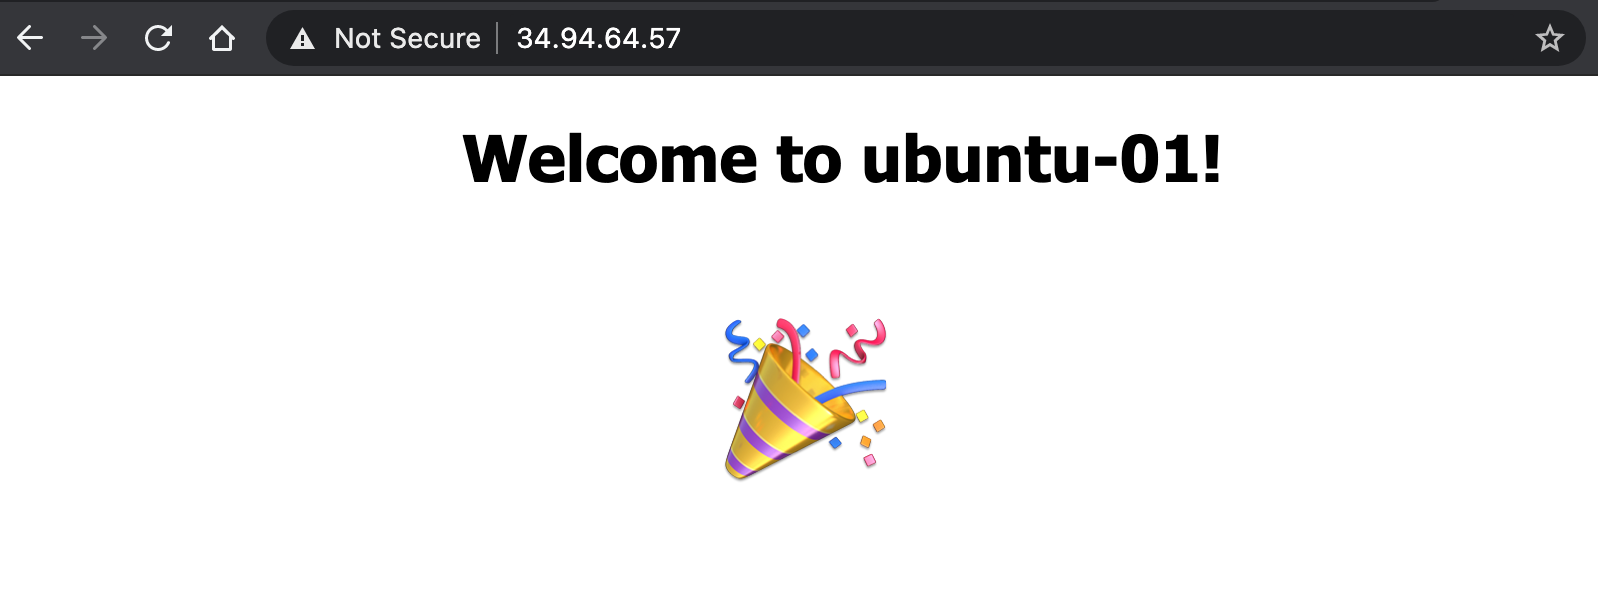
I am now able to access my test webserver via the allocated public IP. Huzzah! More information on firewall tables can be found in the GCVE documentation.
Load Balancing with NSX-T
Now that the test webserver is working as expected, it’s time to implement a load balancer in NSX-T. Keep in mind that GCP also has a native load balancing service, but that is beyond the scope of this post.
Public IPs can be assigned to any private IP, not just IPs assigned to VMs. For this example, I’ll configure the NSX-T load balancer and move the previously allocated public IP to the load balancer VIP. There are several steps needed to create a load balancer, so let’s dive in.
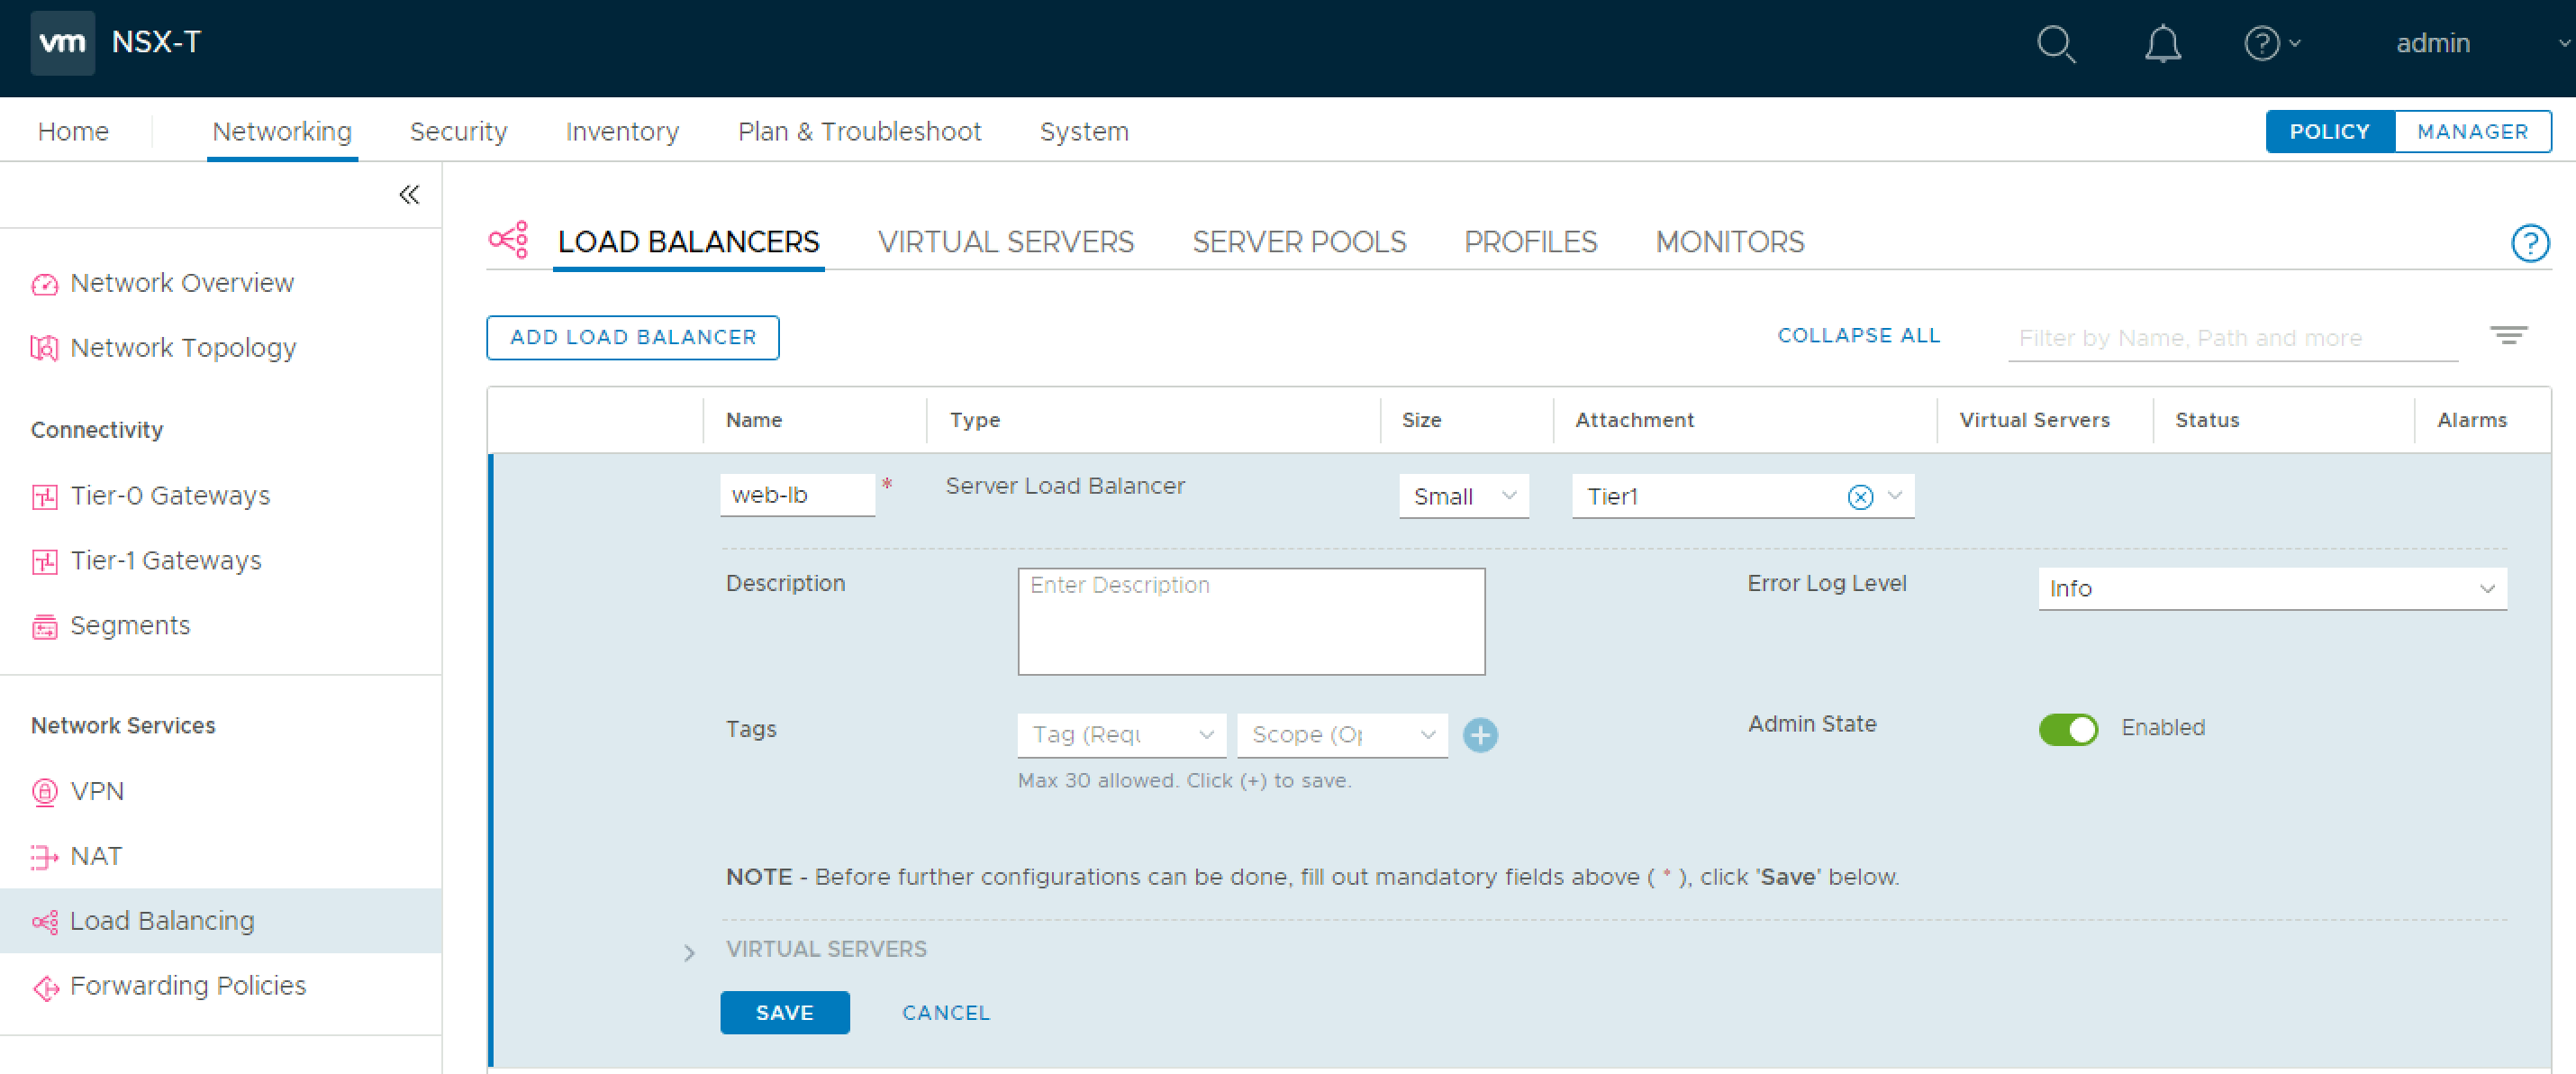
The first step is to create a new load balancer via the Load Balancing screen in NSX-T Manager. Provide a name, choose a size, and the tier 1 router to host the load balancer. Click Save. Now, expand the Virtual Servers section and click Set Virtual Servers.
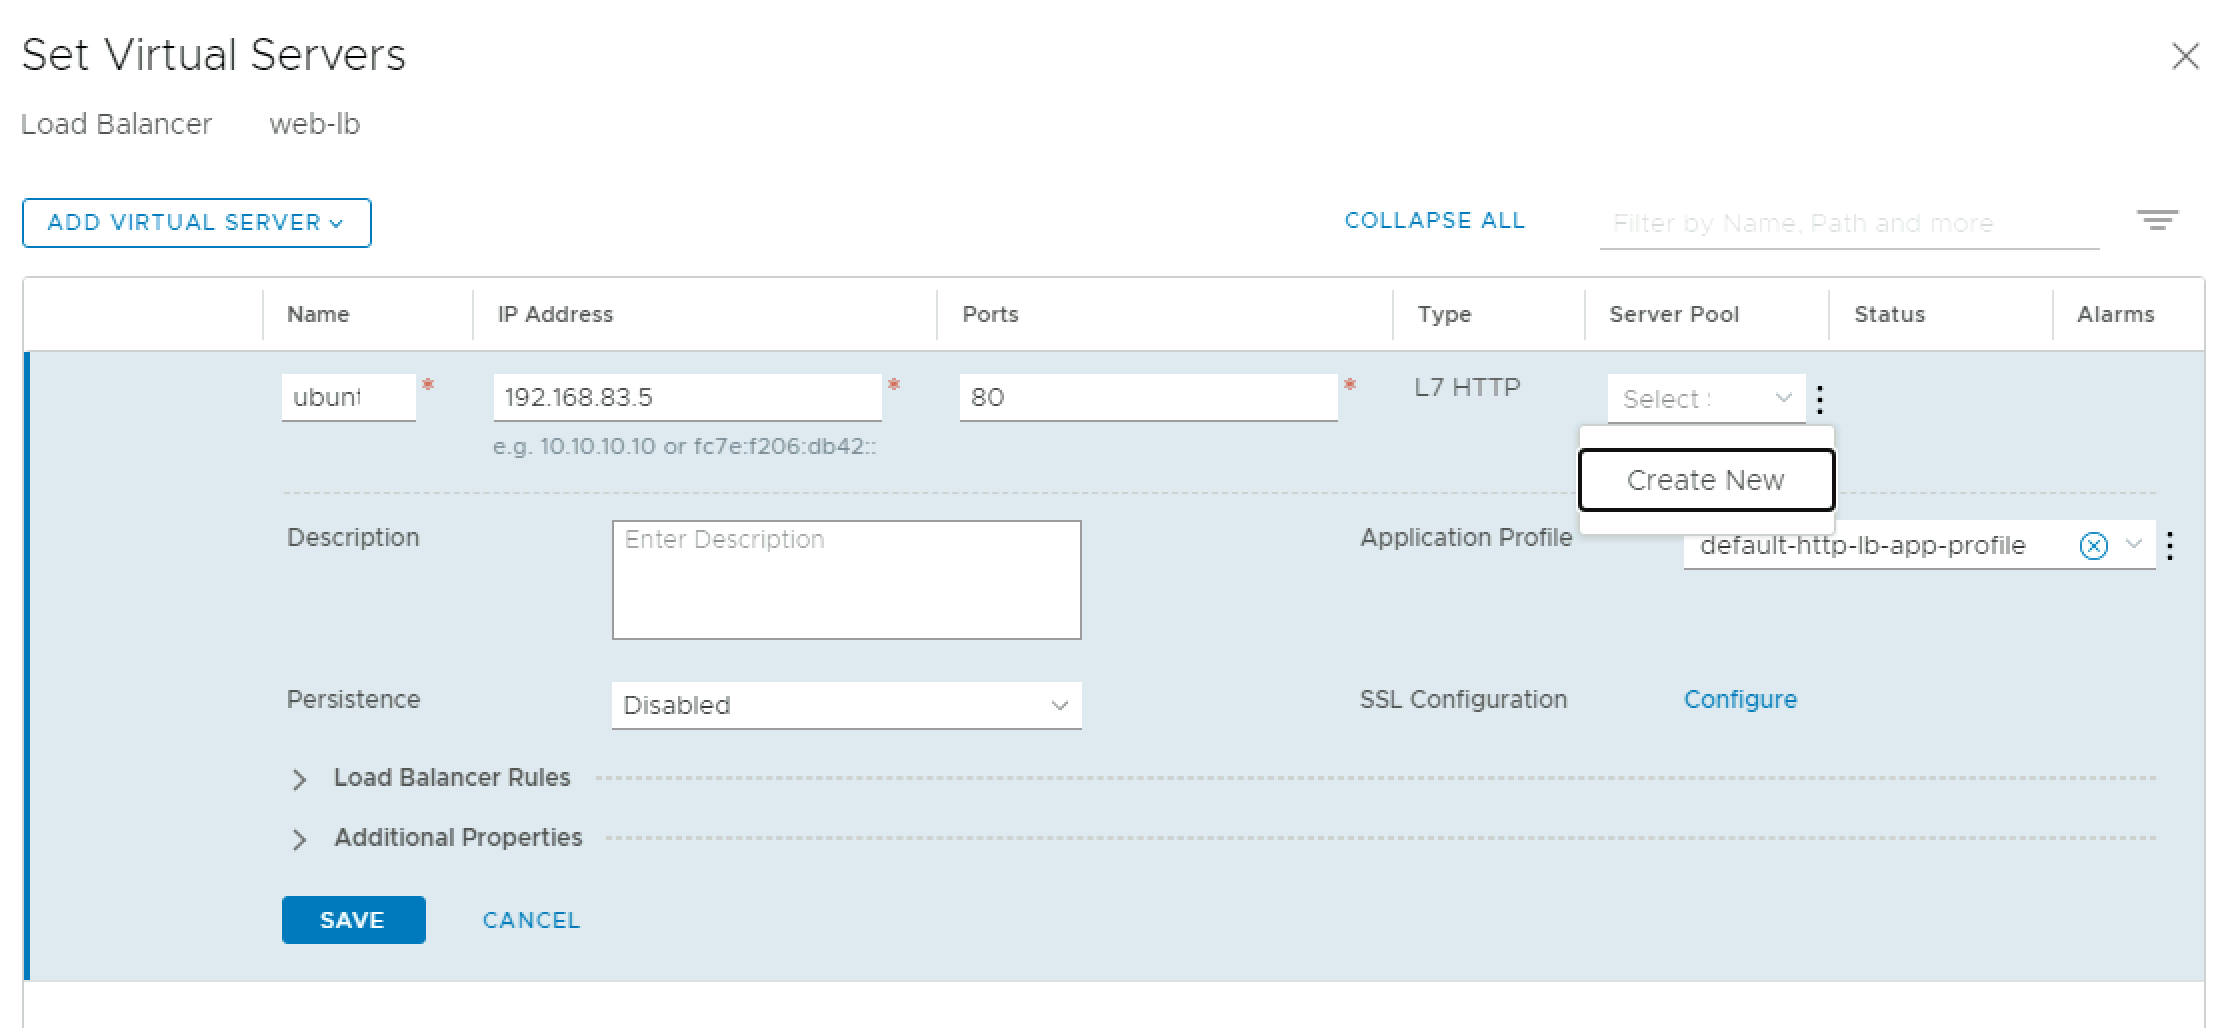
This is where the virtual server IP (VIP) will be configured, along with a backing server pool. Provide a name and internal IP for the VIP. I used an IP that lives in the same segment as my servers, but you could create a dedicated segment for your VIP. Click the dropdown under Server Pool and click Create New.
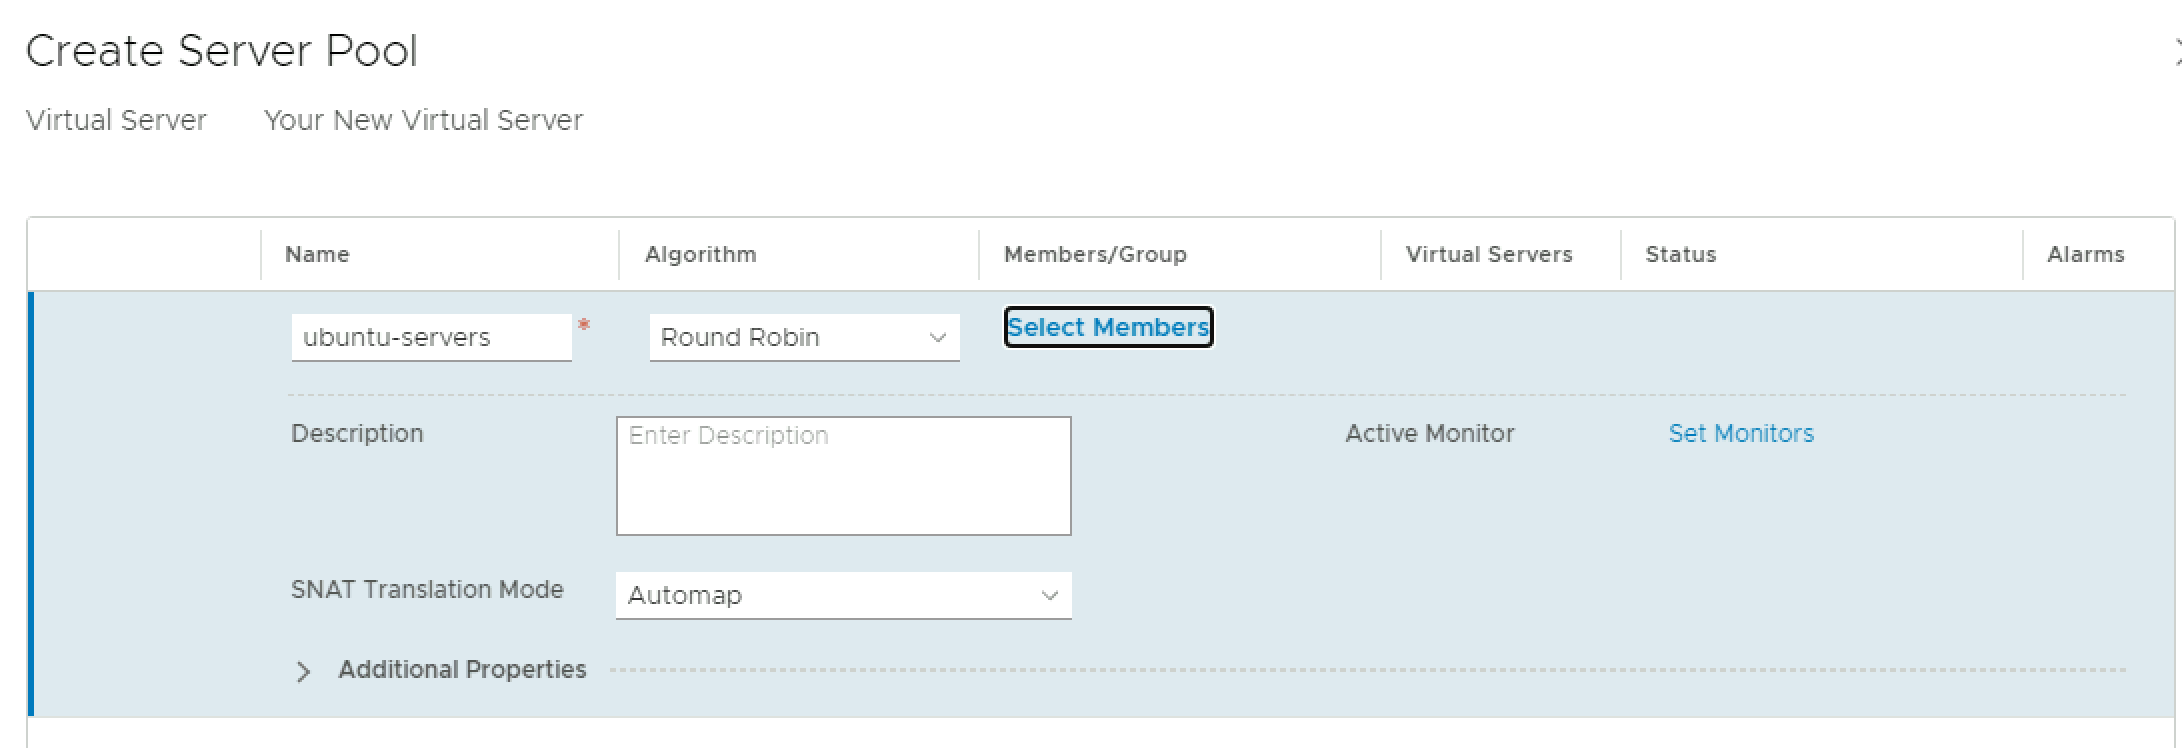
Next, provide a name for your server pool, and choose a load balancing algorithm. Click Select Members to add VMs to the pool.
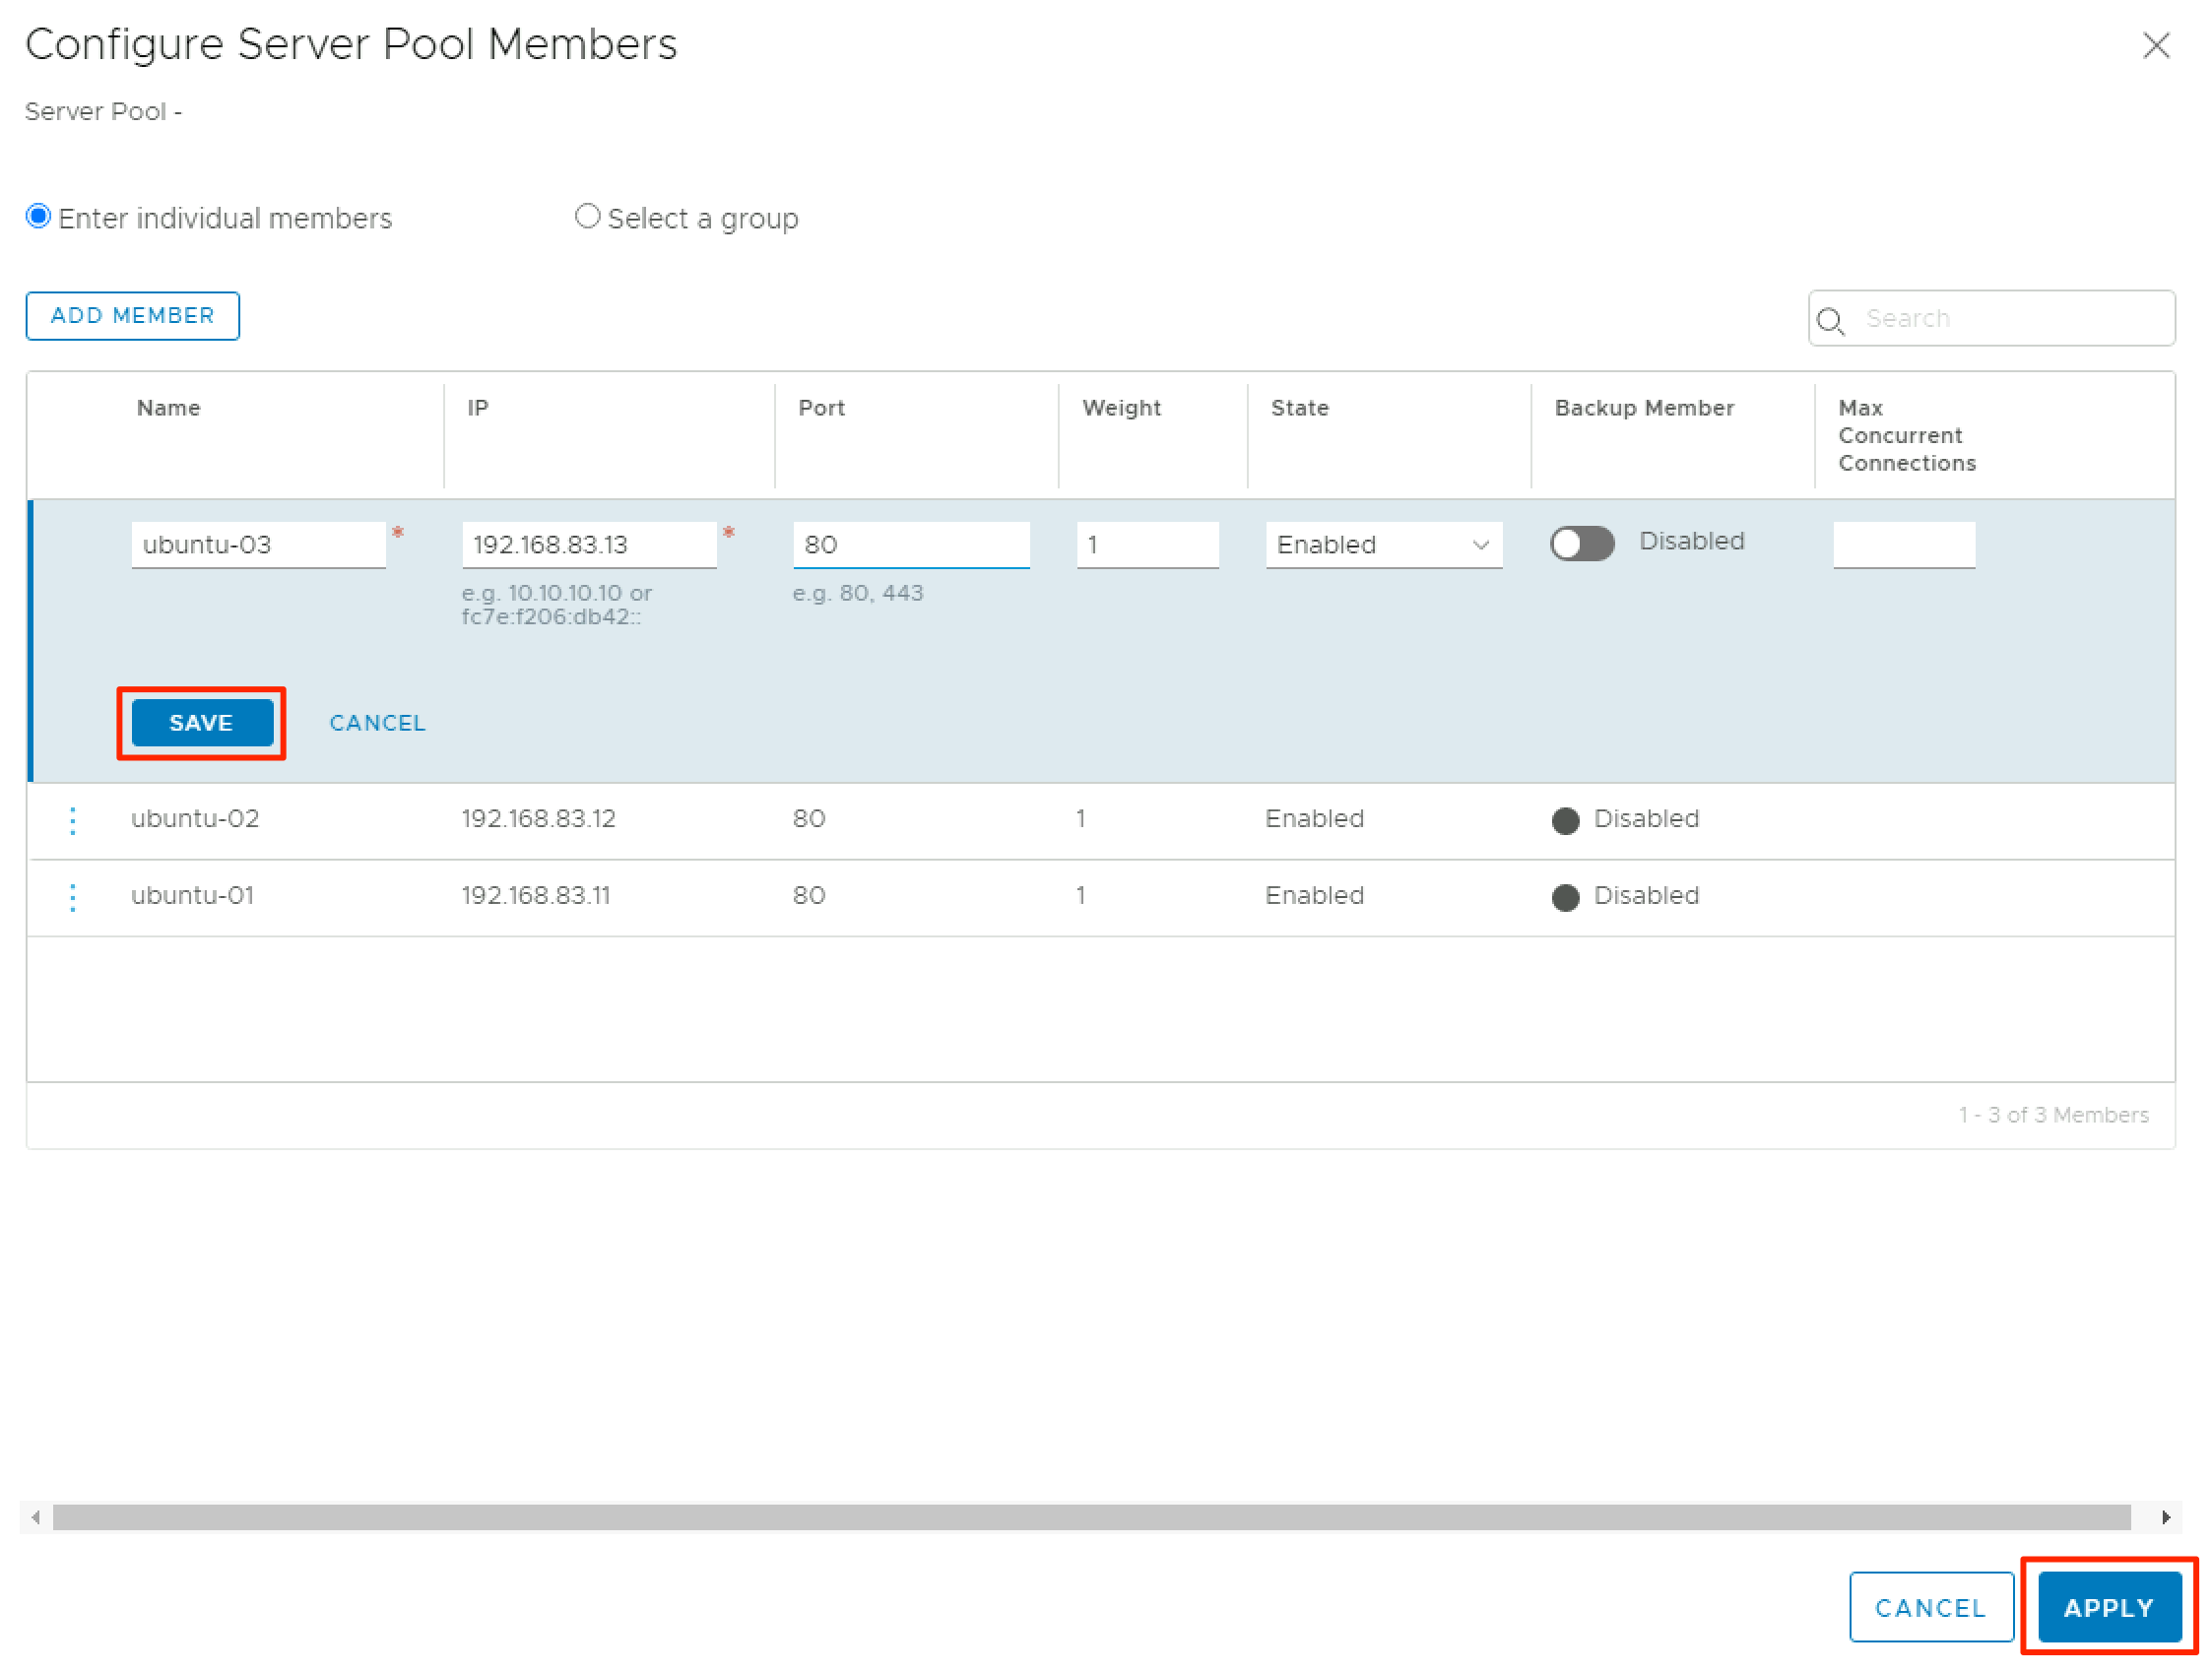
Click Add Member to add a new VM to the pool and provide the internal IP and port. Rinse and repeat until you’ve added all of the relevant VMs to your virtual server pool, then click Apply.
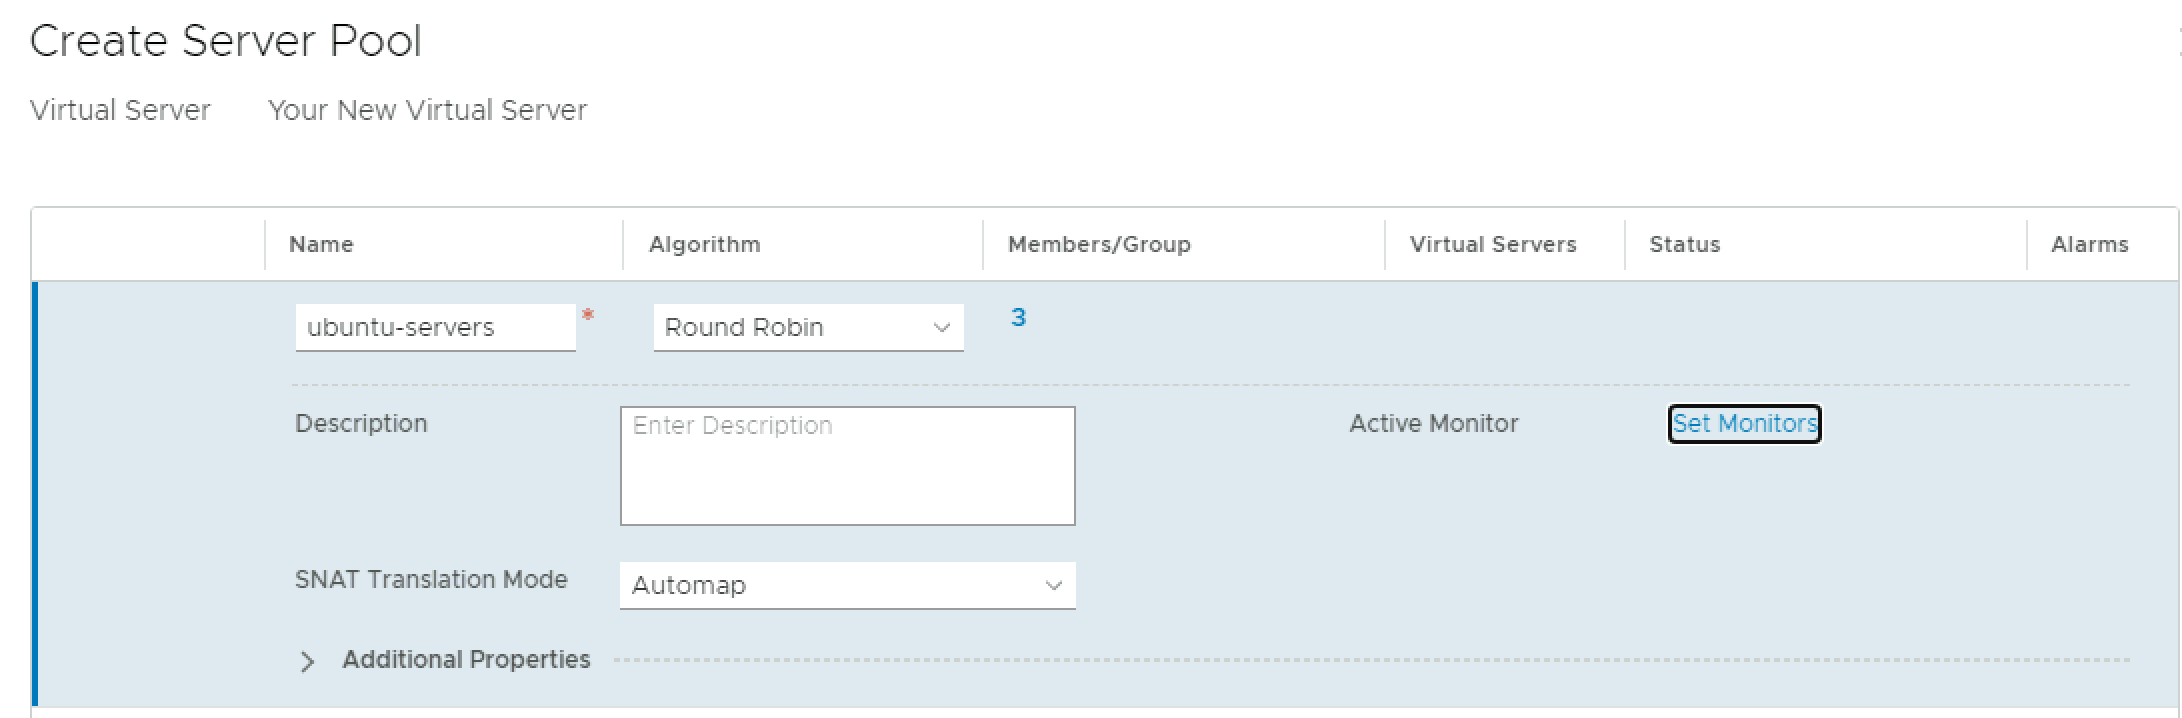
You’ll be taken back to the server pool screen, where you can add a monitor to check the health of the VMs in your pool. Click Set Monitors to choose a monitor.
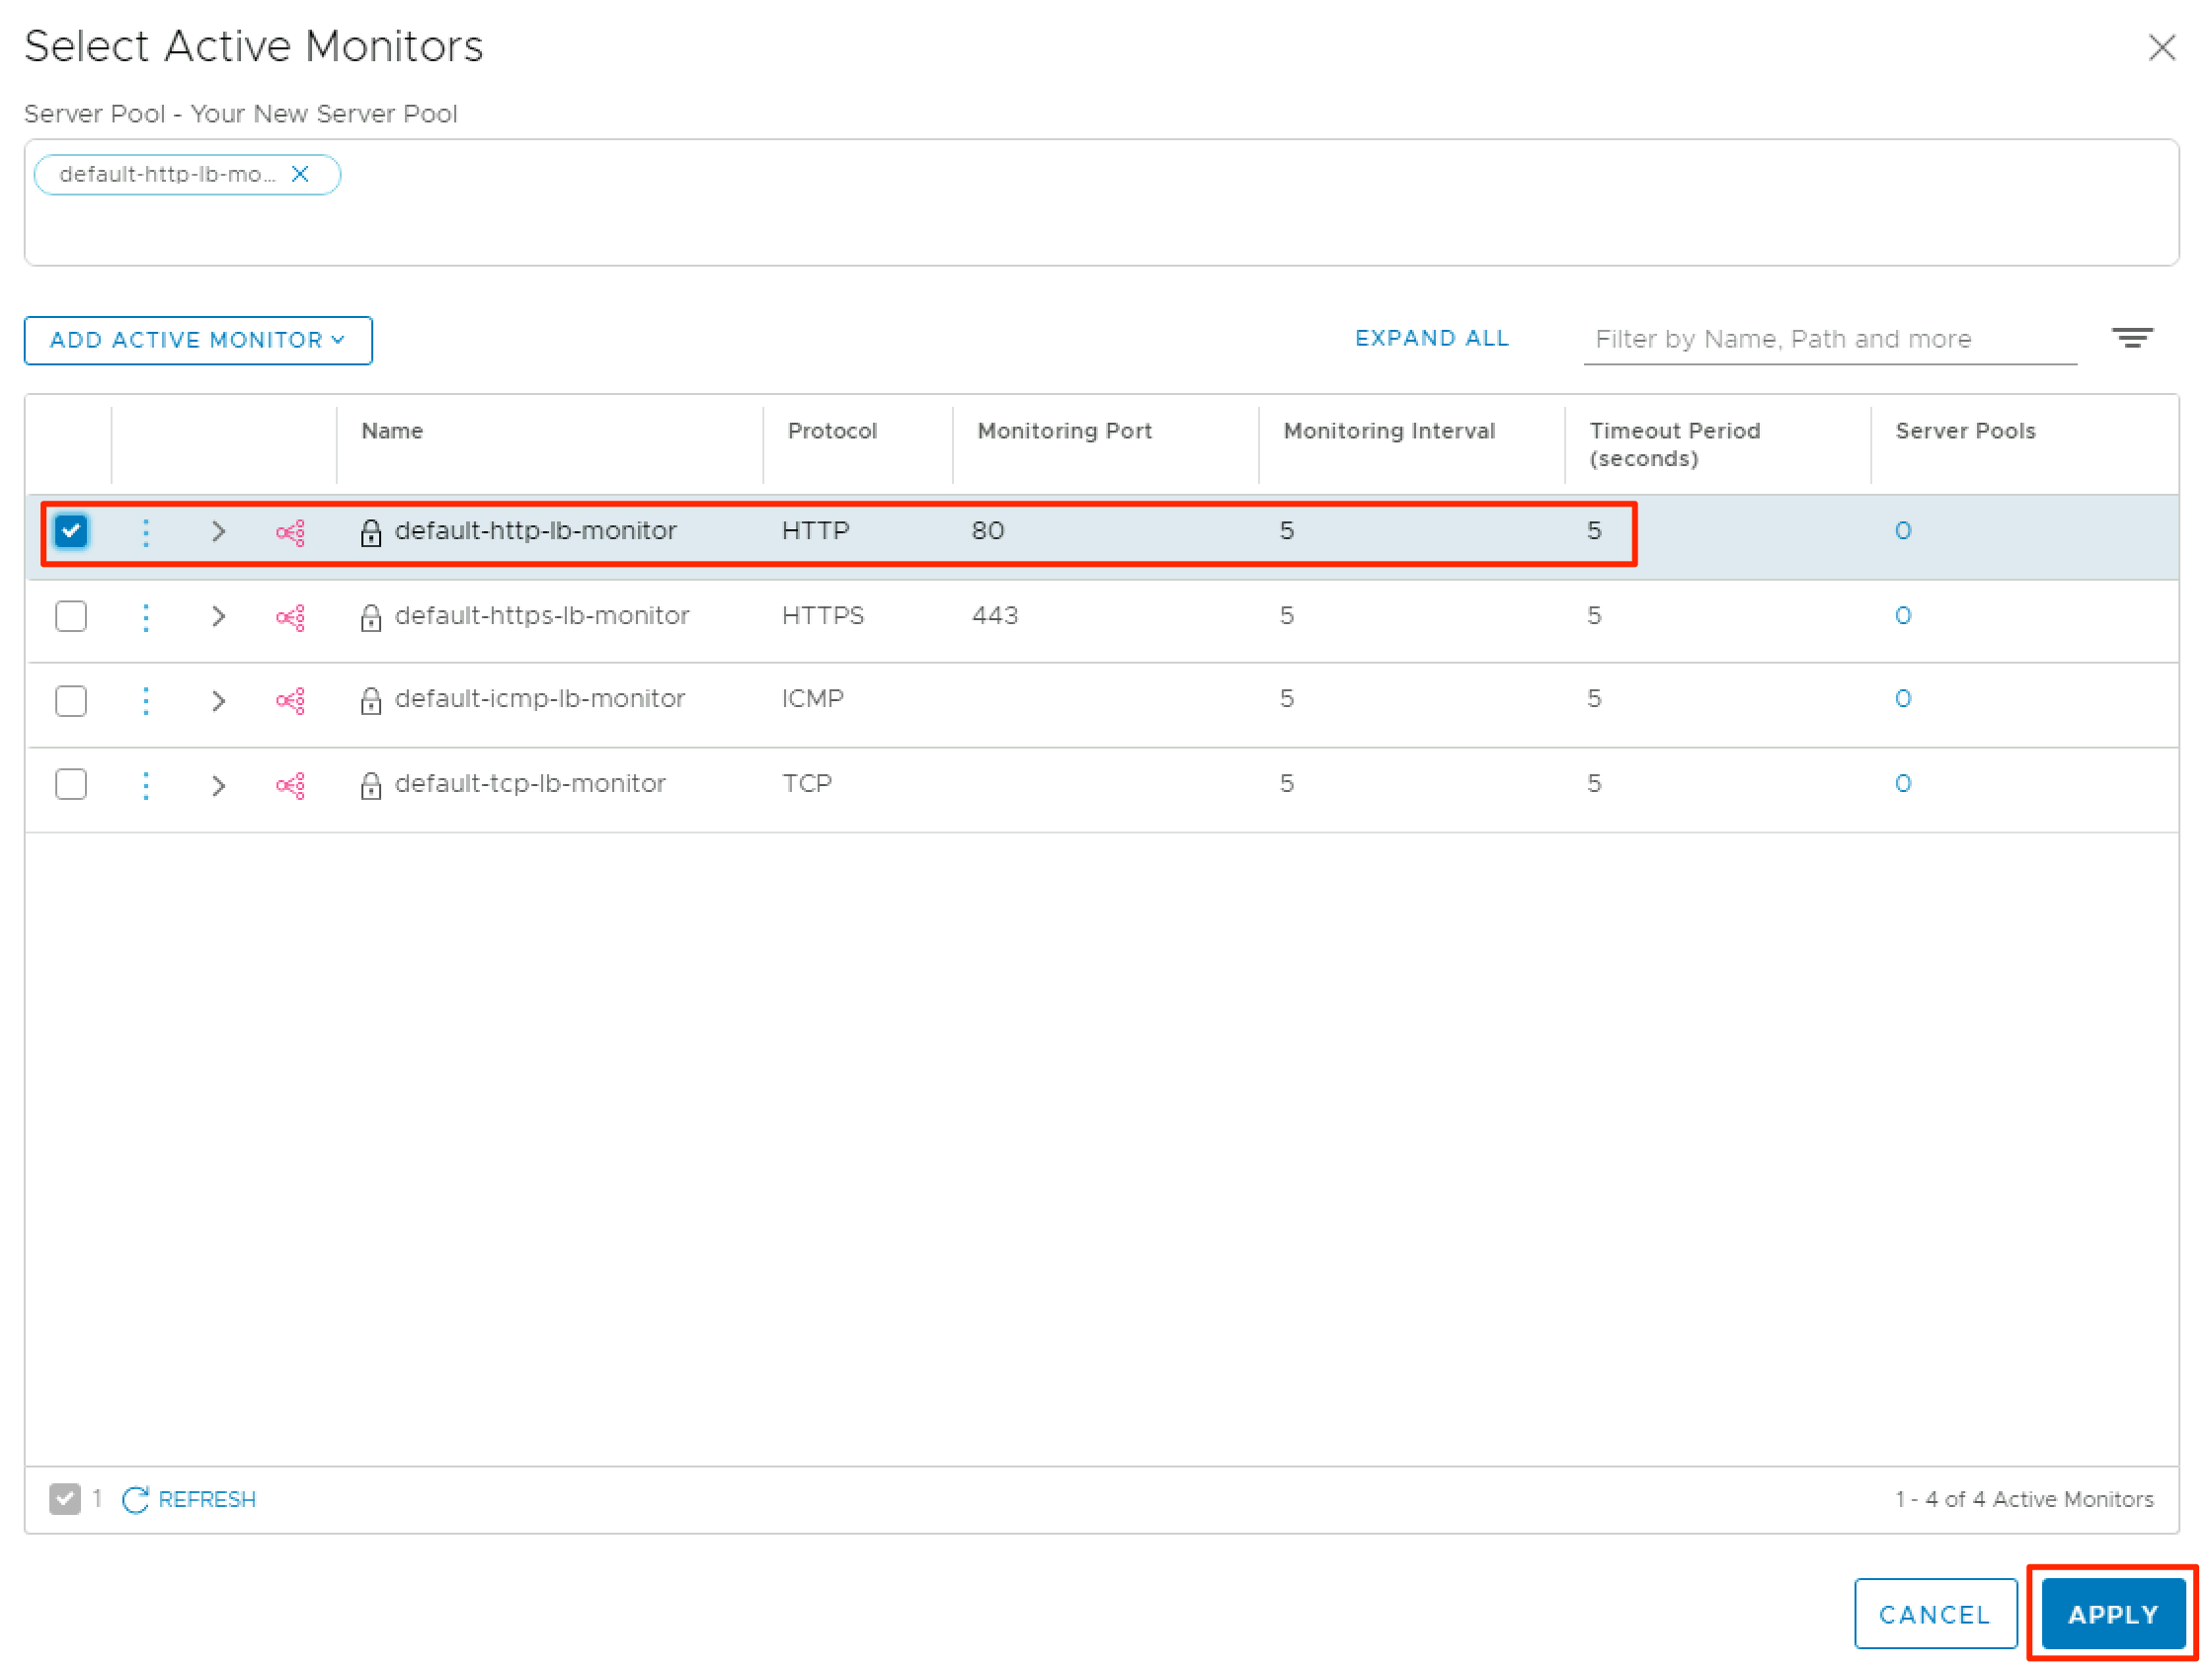
My pool members are running a simple webserver on port 80, so I’m using the default-http-lb-monitor. After choosing the appropriate monitor, click Apply.
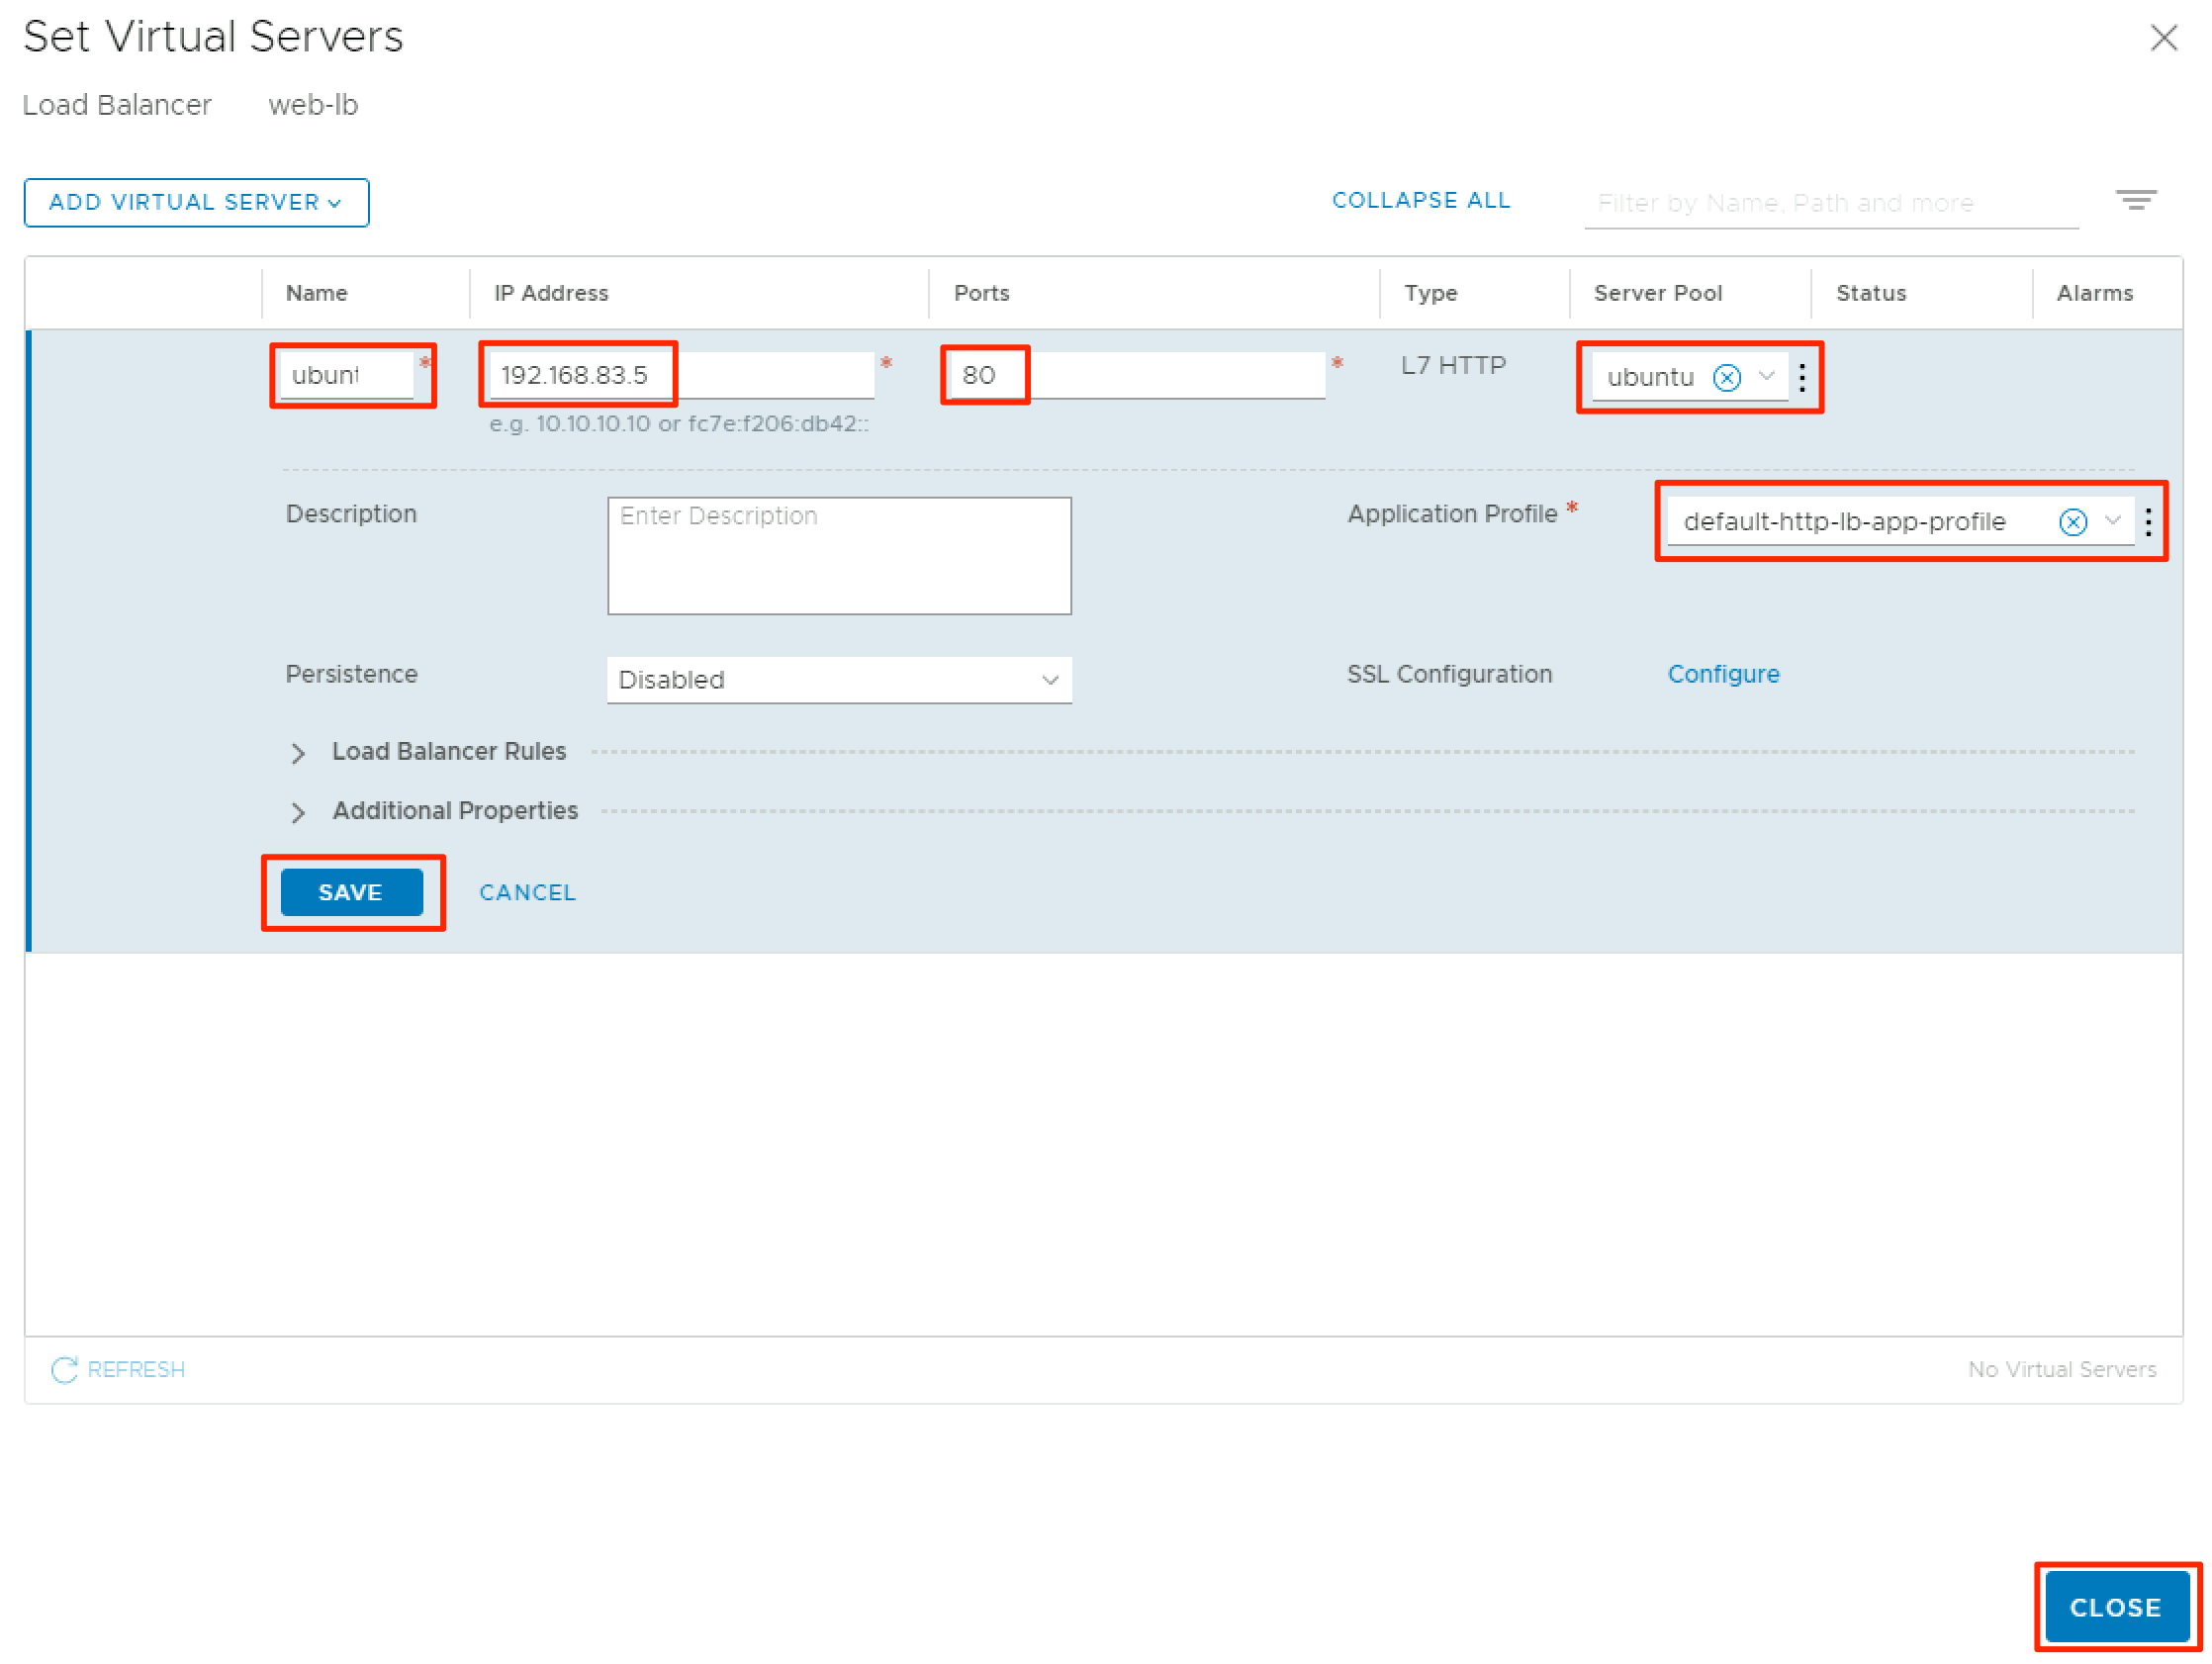
Review the settings for the VIP and click Close.
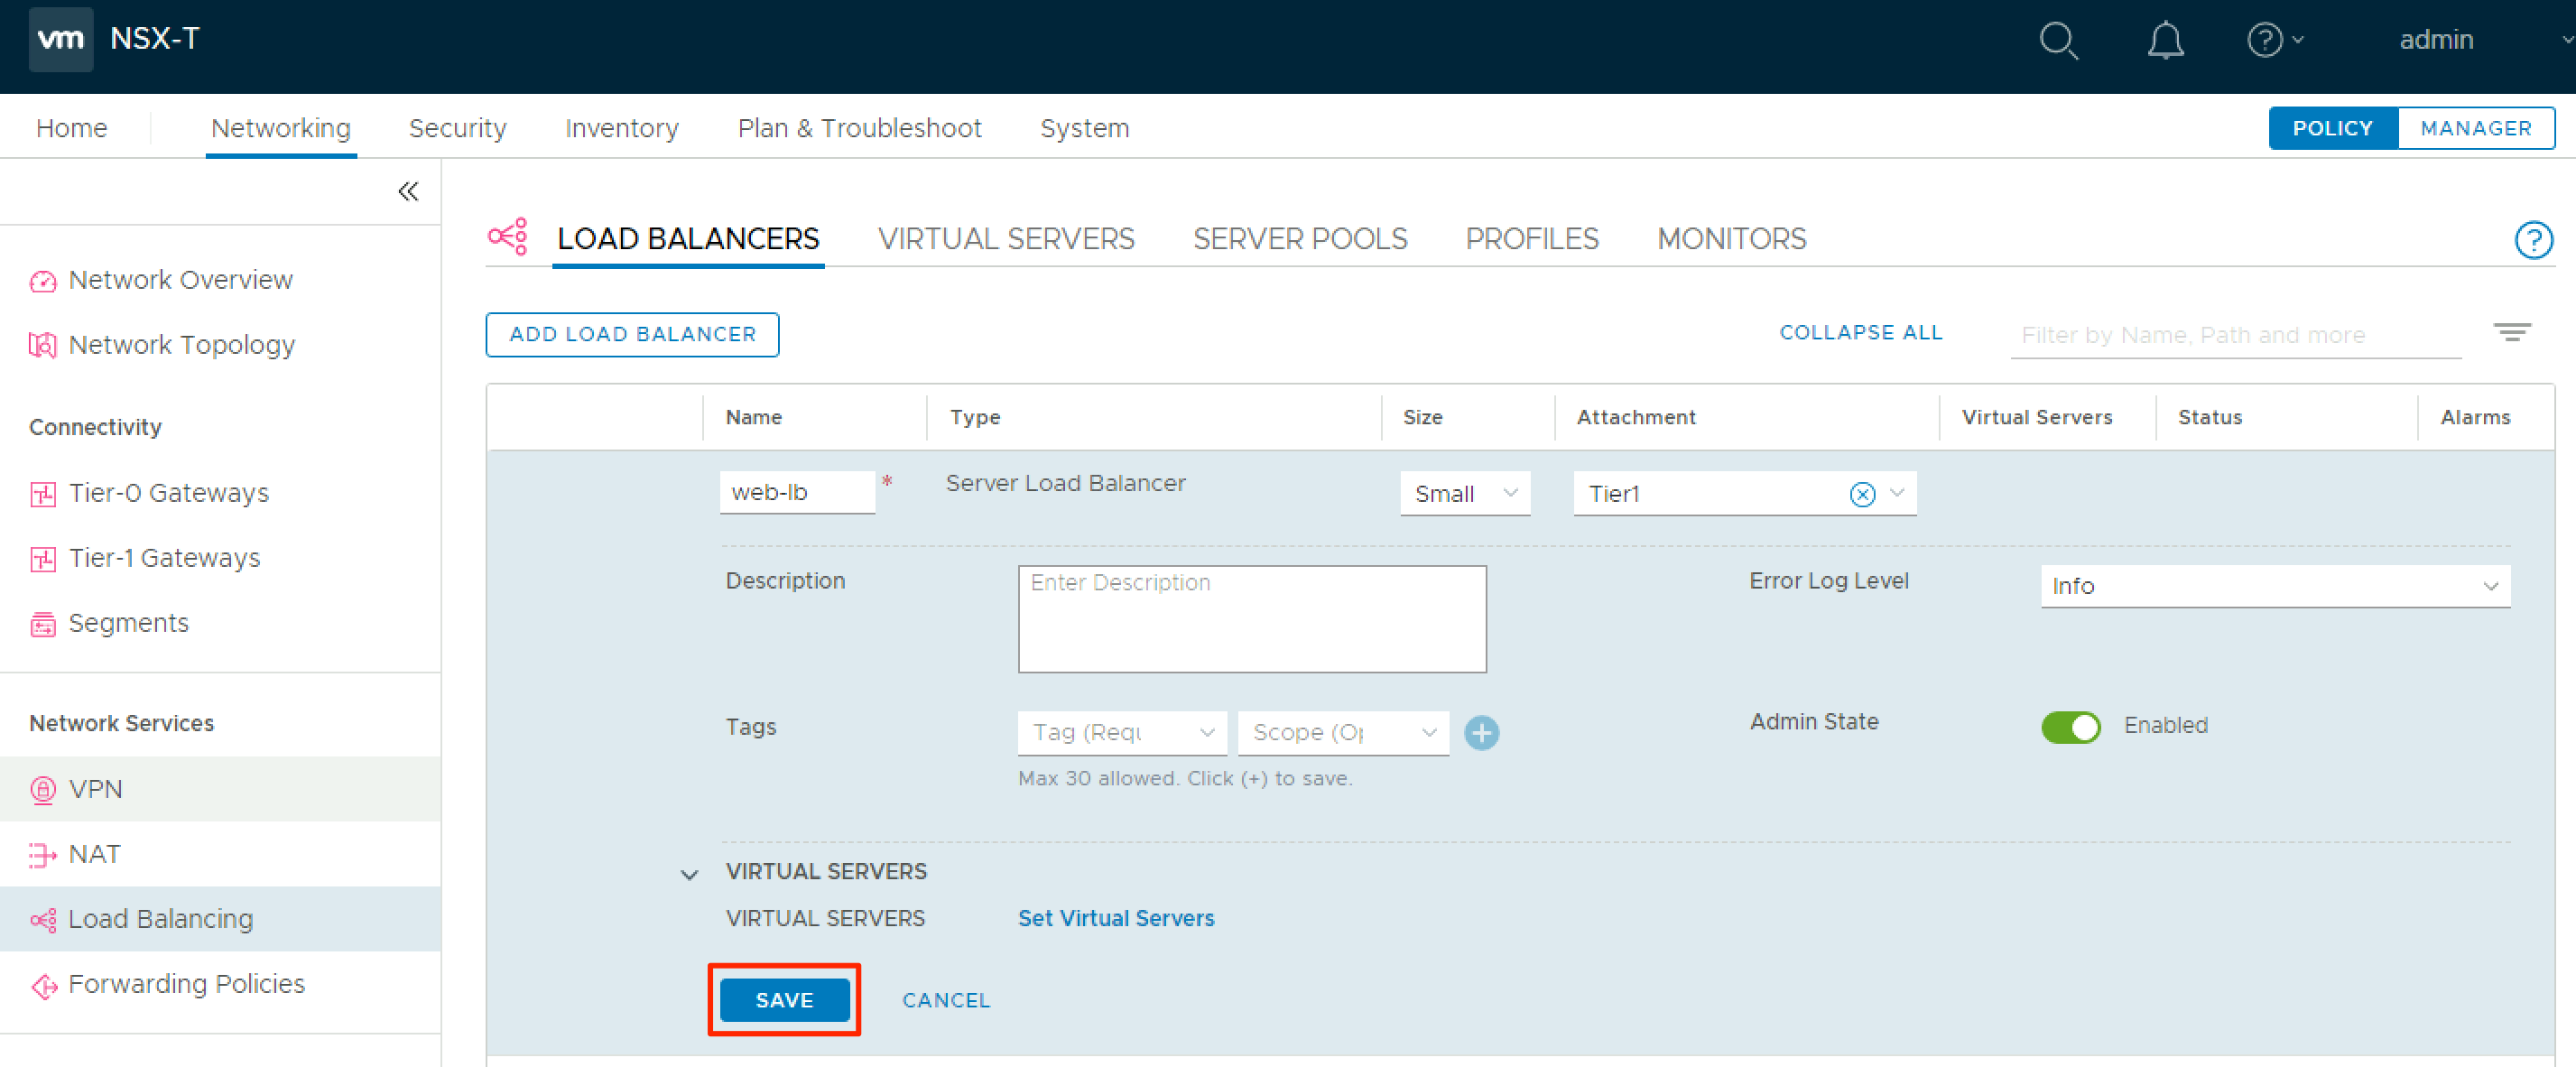
Finally, click Save to apply the new settings to your load balancer.
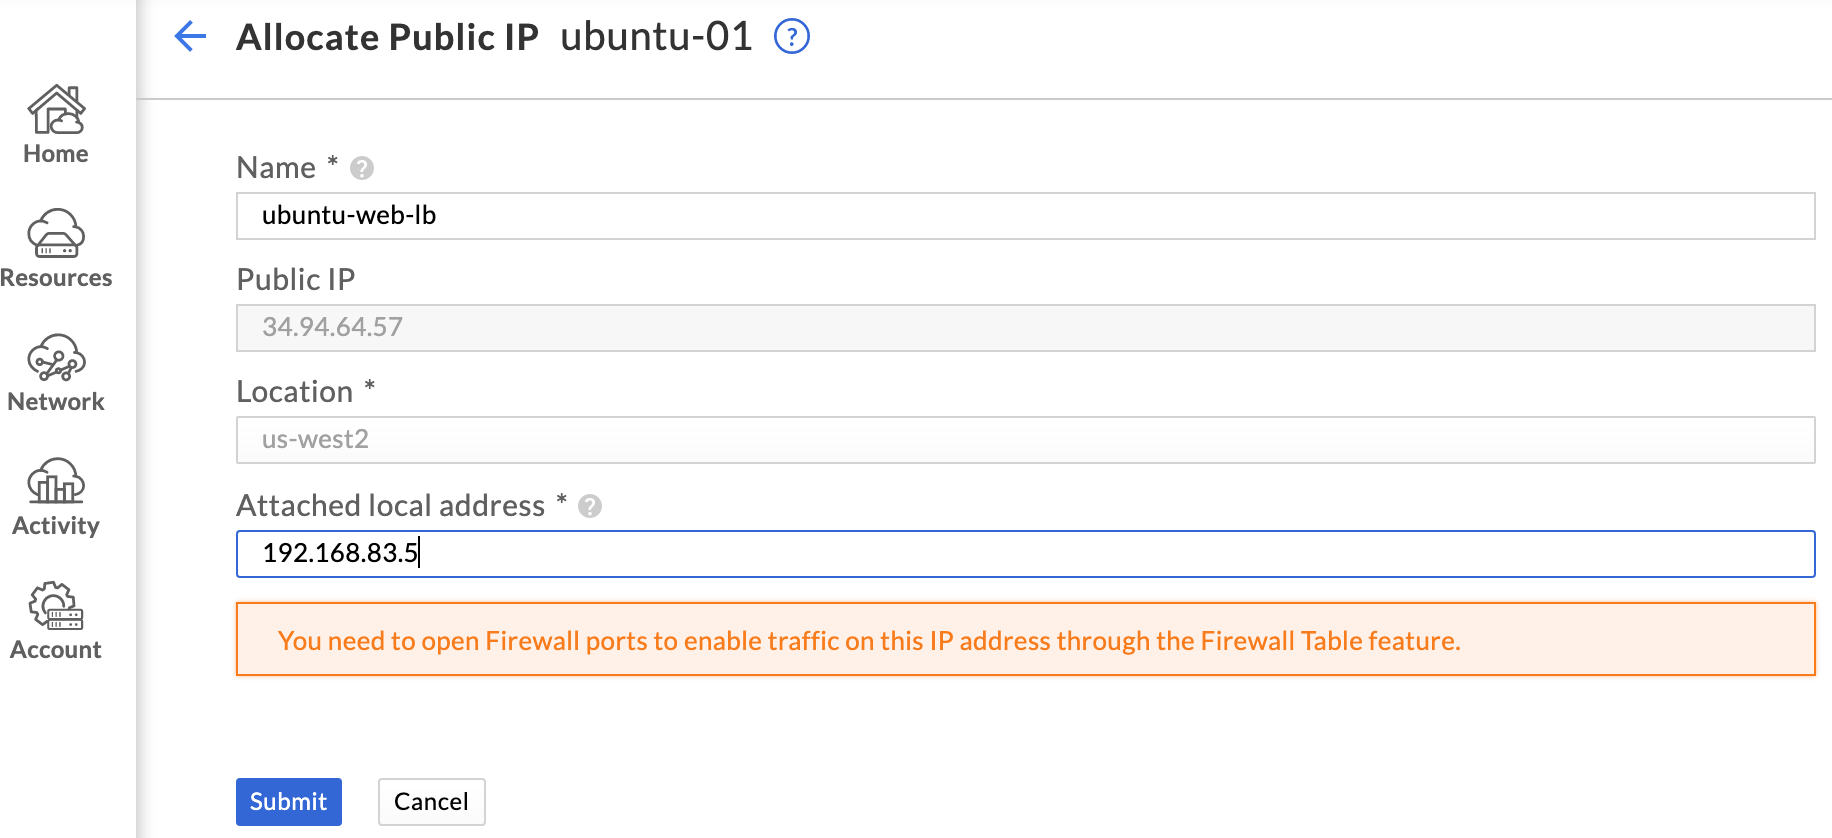
The last step is to browse to Network > Public IPs in the GCVE portal and edit the existing public IP allocation. Update the name as appropriate, and change the attached local address to the load balancer VIP. No firewall rules need to be changed since the traffic is coming in over the same port (tcp/80).
Browsing to the allocated public IP and pressing refresh a few times shows that our load balancer is working as expected!
Accessing Cloud-Native Services
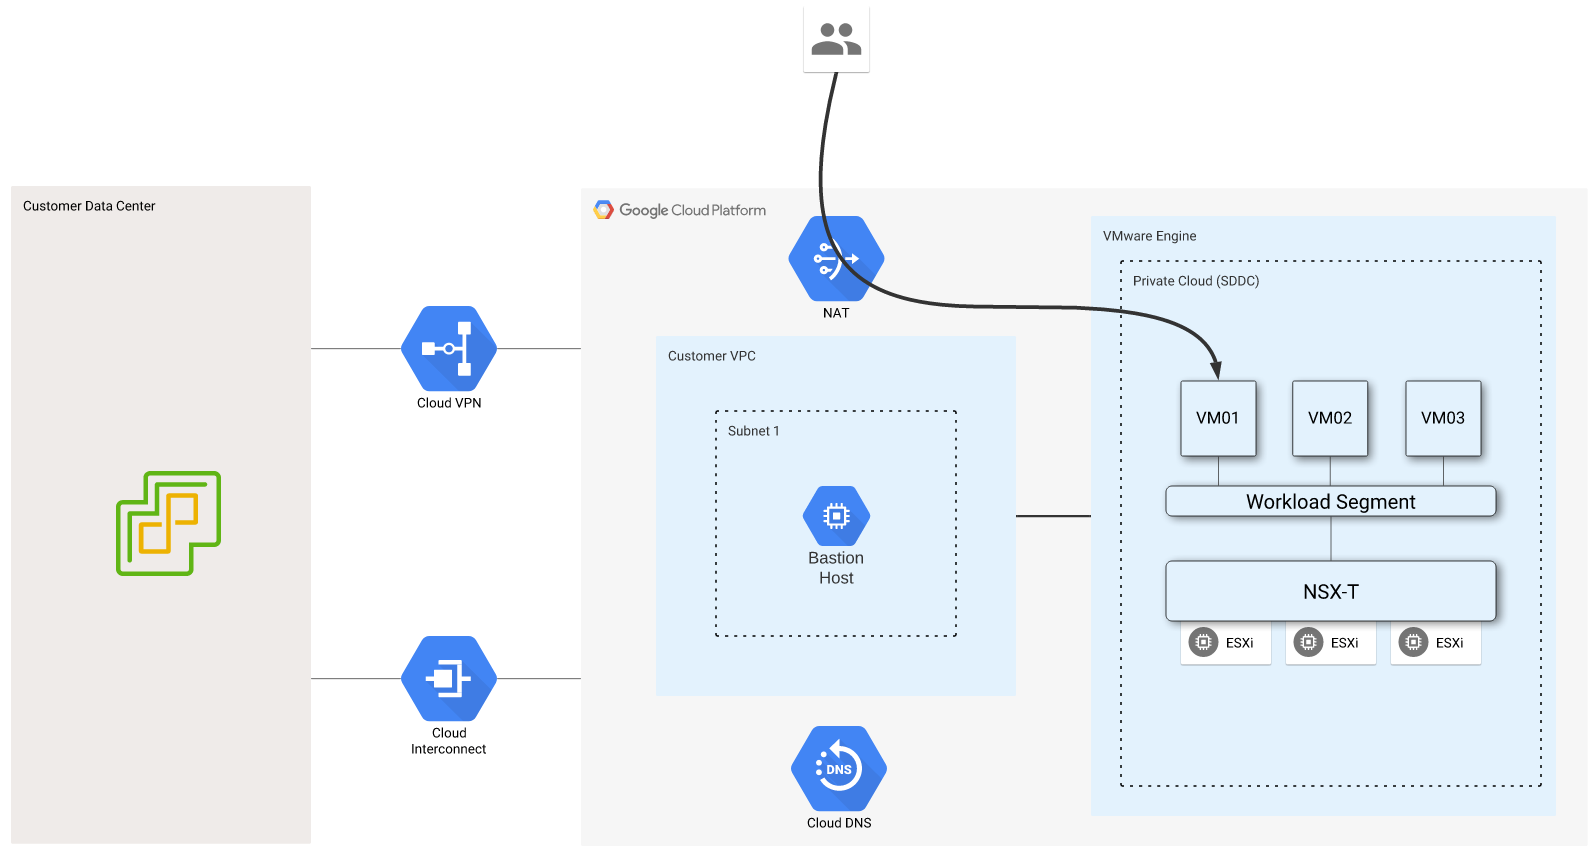
The last addition to this example is to include a GCP cloud-native service. I’ve chosen to use Cloud Storage because it is a simple example, and it provides incredible utility. This diagram illustrates my desired configuration.

My goal is to stage a simple static website in a Google Storage bucket, then mount the bucket as a read-only filesystem on each of my webservers. The bucket will be mounted to /var/www/html and will replace the testing page that had been staged on each server. You may be thinking, “This is crazy. Why not serve the static site directly from Google Storage?!” This is a valid question, and my response is that this is merely an example, not necessarily a best practice. I could have chosen to use Google Filestore instead of Google Storage as well. This illustrates that there is more than one way to do many things in the cloud.
The first step is to create a Google Storage bucket, which I completed with this simple Terraform code:
provider "google" {
  project = var.project
  region  = var.region
  zone    = var.zone
}

resource "google_storage_bucket" "melliott-vmw-static-site" {
  name          = "melliott-vmw-static-site"
  location      = "US"
  force_destroy = true
  storage_class = "STANDARD"
}

resource "google_storage_bucket_acl" "melliott-vmw-static-site-acl" {
  bucket = google_storage_bucket.melliott-vmw-static-site.name

  role_entity = [
    "OWNER:[email protected]"
  ]
}
Next, I found a simple static website example, which I stored in the bucket and modified for my needs. After staging this, I completed the following steps on each webserver to mount the bucket.
- Install the Google Cloud SDK (https://cloud.google.com/sdk/docs/install)
- Install gcsfuse (https://github.com/GoogleCloudPlatform/gcsfuse/blob/master/docs/installing.md), which is used to mount Google Storage buckets in linux via FUSE
- Authenticate to Google Cloud with
gcloud auth application-default login. This will provide a URL that will need to be pasted into a browser to complete authentication. The verification code returned will then need to be pasted back into the prompt on the webserver. - Remove existing files in
/var/www/html - Mount the bucket as a read-only filesystem with
gcsfuse -o allow_other -o ro [bucket-name] /var/www/html
root@ubuntu:/var/www# gcsfuse -o allow_other -o ro melliott-vmw-static-site /var/www/html
2021/05/04 16:19:10.680365 Using mount point: /var/www/html
2021/05/04 16:19:10.686743 Opening GCS connection...
2021/05/04 16:19:11.037846 Mounting file system "melliott-vmw-static-site"...
2021/05/04 16:19:11.042605 File system has been successfully mounted.
root@ubuntu:/var/www#
root@ubuntu:/var/www#
root@ubuntu:/var/www# ls /var/www/html
assets  error  images  index.html  LICENSE.MD  README.MD
After mounting the bucket and running an ls on /var/www/html, I can see that my static website is mounted correctly.
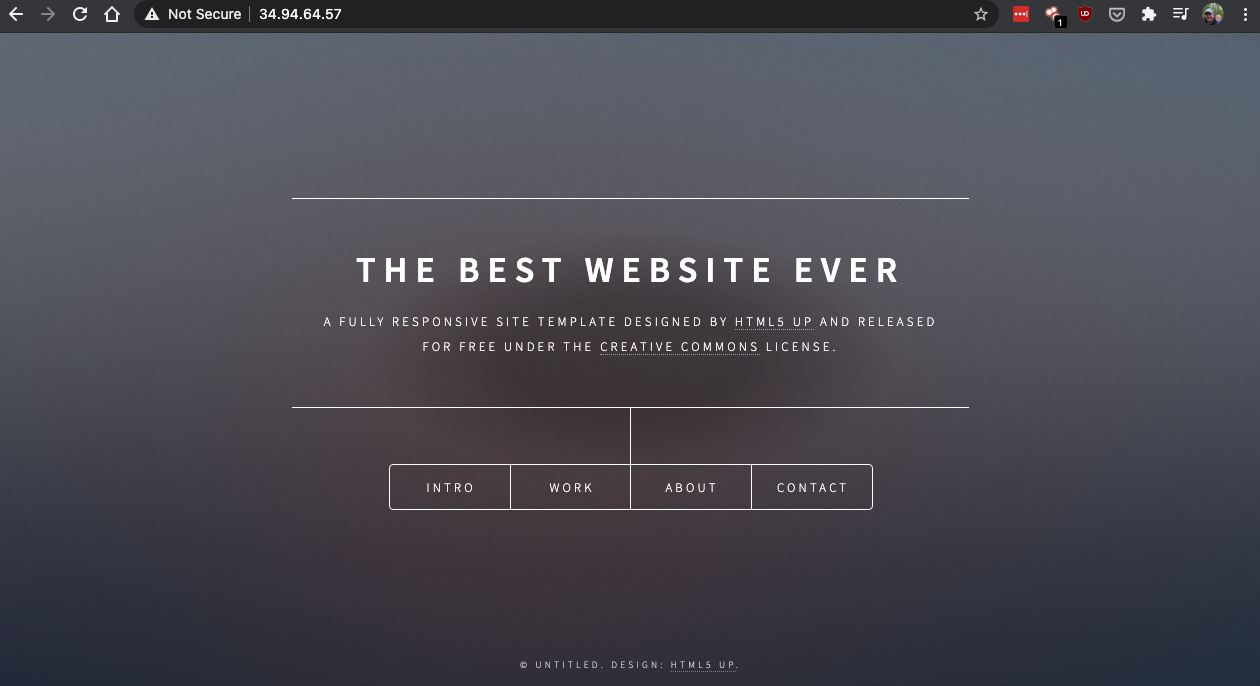
Browsing to the public IP fronting my load balancer VIP now displays my static website, hosted in a Google Storage bucket. Pretty snazzy!
Google Private Access
My GCVE environment has internet access enabled, so native services are accessed via the internet gateway. If you don’t want to allow internet access for your environment, you can still access native services via Private Google Access. Much of the GCP documentation for this feature focuses on access to Google APIs from locations other than GCVE, but it is not too difficult to apply these practices to GCVE.
Google Private Access is primarily enabled by DNS, but you still need to enable this feature for any configured VPCs. The domain names used for this service are private.googleapis.com and restricted.googleapis.com. I was able to resolve both of these from my GCVE VMs, but my VMs are configured to use the resolvers in my GCVE environment. If you cannot resolve these hostnames, make sure you are using the GCVE DNS servers. As a reminder, these server addresses can be found under Private Cloud DNS Servers in the summary page for your GCVE cluster. You can find more information on Google Private Access here.
Viewing Routing Information
Knowing where to find routing tables is incredibly helpful when troubleshooting connectivity issues. There are a handful of places to look in GCP and GCVE to find this information.
VPC Routes
You can view routes for a VPC in the GCP portal by browsing to VPC networks, clicking on the desired VPC, then clicking on the Routes tab. If you are using VPC peering, you will notice a message that says, “This VPC network has been configured to import custom routes using VPC Network Peering. Any imported custom dynamic routes are omitted from this list, and some route conflicts might not be resolved. Please refer to the VPC Network Peering section for the complete list of imported custom routes, and the routing order for information about how GCP resolves conflicts.” Basically, this message says that you will not see routes for your GCVE environment in this table.
VPC Network Peering Routes
To see routes for your GCVE environment, browse to VPC Network Peering and choose the servicenetworking-googleapis-com entry for your VPC. You will see routes for your GCVE environment under Imported Routes and any subnets in your VPC under Exported Routes. You can also view these routes using the gcloud tool.
- View imported routes:
gcloud compute networks peerings list-routes servicenetworking-googleapis-com --network=[VPC Name] --region=[REGION]] --direction=INCOMING - View exported routes:
gcloud compute networks peerings list-routes servicenetworking-googleapis-com --network=[VPC Name] --region=[REGION]] --direction=OUTGOING
Example results:
melliott@melliott-a01 gcp-bucket % gcloud compute networks peerings list-routes servicenetworking-googleapis-com  --network=gcve-usw2 --region=us-west2 --direction=INCOMING
DEST_RANGE         TYPE                   NEXT_HOP_REGION  PRIORITY  STATUS
192.168.80.0/29    DYNAMIC_PEERING_ROUTE  us-west2         0         accepted
192.168.80.0/29    DYNAMIC_PEERING_ROUTE  us-west2         0         accepted
192.168.80.16/29   DYNAMIC_PEERING_ROUTE  us-west2         0         accepted
192.168.80.16/29   DYNAMIC_PEERING_ROUTE  us-west2         0         accepted
192.168.80.8/29    DYNAMIC_PEERING_ROUTE  us-west2         0         accepted
192.168.80.8/29    DYNAMIC_PEERING_ROUTE  us-west2         0         accepted
192.168.80.112/28  DYNAMIC_PEERING_ROUTE  us-west2         0         accepted
192.168.80.112/28  DYNAMIC_PEERING_ROUTE  us-west2         0         accepted
10.30.28.0/24      DYNAMIC_PEERING_ROUTE  us-west2         0         accepted
10.30.28.0/24      DYNAMIC_PEERING_ROUTE  us-west2         0         accepted
192.168.81.0/24    DYNAMIC_PEERING_ROUTE  us-west2         0         accepted
192.168.81.0/24    DYNAMIC_PEERING_ROUTE  us-west2         0         accepted
192.168.83.0/24    DYNAMIC_PEERING_ROUTE  us-west2         0         accepted
192.168.83.0/24    DYNAMIC_PEERING_ROUTE  us-west2         0         accepted
NSX-T
Routing and forwarding tables can be downloaded from the NSX-T manager web interface or via API. It’s also reasonably easy to grab the routing table with PowerCLI. The following example displays the routing table from the T0 router in my GCVE environment.
Import-Module VMware.PowerCLI
Connect-NsxtServer -Server my-nsxt-manager.gve.goog
$t0s = Get-NsxtPolicyService -Name com.vmware.nsx_policy.infra.tier0s
$t0_name = $t0s.list().results.display_name
$t0.list($t0_name).results.route_entries | Select-Object network,next_hop,route_type | Sort-Object -Property network

network                  next_hop         route_type
-------                  --------         ----------
0.0.0.0/0                192.168.81.225   t0s
0.0.0.0/0                192.168.81.241   t0s
10.30.28.0/24            169.254.160.3    t1c
10.30.28.0/24            169.254.160.3    t1c
169.254.0.0/24                            t0c
169.254.160.0/31                          t0c
169.254.160.0/31                          t0c
169.254.160.2/31                          t0c
169.254.160.2/31                          t0c
192.168.81.224/28                         t0c
192.168.81.240/28                         t0c
192.168.83.0/24          169.254.160.1    t1c
192.168.83.0/24          169.254.160.1    t1c
VPN Connectivity
I haven’t talked much about VPNs in this blog series, but it is an important component that deserves more attention. Provisioning a VPN to GCP is an easy way to connect to your GCVE environment if you are waiting on a Cloud Interconnect to be installed. It can also be used as backup connectivity if your primary connection fails. NSX-T has can terminate an IPSec VPN, but I would recommend using Cloud VPN instead. This will ensure you have connectivity to any GCP-based resources along with GCVE.
I’ve put together some example Terraform code to provision the necessary VPN-related resources in GCP. The example code is available at https://github.com/shamsway/gcp-terraform-examples in the gcve-ha-vpn subdirectory. Using this example will create the minimum configuration needed to stand up a VPN to GCP/GCVE. It is assumed that you have already created a VPC and configured peering with your GCVE cluster. This example does not create a redundant VPN solution, but it can be easily extended to do so by creating a secondary Cloud Router, interface, and BGP peer. You can find more information on HA VPN topologies in the GCP documentation. After using the example code, you will still need to configure the VPN settings at your site. Google provides configuration examples for several different vendors at Using third-party VPNs with Cloud VPN. I’ve written previously about VPNs for cloud connectivity, as well as other connection methods, in Cloud Connectivity 101
DNS Notes
I’ve saved the most important topic for last. DNS is a crucial component when operating in the cloud, so here are a few tips and recommendations to make sure you’re successful. Cloud DNS has a 100% uptime SLA, which is not something you see very often. This service is so crucial to GCP that Google has essentially guaranteed that it always be available. That is the type of guarantee that provides peace of mind, especially when you will have so many other services and applications relying on it.
In terms of GCVE, you must be able to properly resolve the hostnames for vCenter, NSX, HCX, and other applications deployed in your environment. These topics are covered in detail at these links:
- Configuring DNS for management appliance access
- Creating and applying DNS profiles
- Configuring authentication using Active Directory
The basic gist is this: the DNS servers running in your GCVE environment will be able to resolve A records for the management applications running in GCVE (vCenter, NSX, HCX, etc.). If you have configured VPC peering with GCVE, Cloud DNS will be automatically configured forward requests to the GCVE DNS servers for any gve.goog hostname. This will allow you to resolve GCVE-related A records from your VPC or bastion host. The last step is to make sure that you can properly resolve GCVE-related hostnames in your local environment. If you are using Windows Server for DNS, you need to configure a conditional forwarder for gve.goog, using the DNS servers running in GCVE. Other scenarios, like configuring BIND, are covered in the documentation links above.
Wrap Up
This is a doozy of a post, so I won’t waste too many words here. I genuinely hope you enjoyed this blog series. There will definitely be more GCVE-related blogs in the future, and you can hit me up any time @NetworkBrouhaha and let me know what topics you’d like to see covered. Thanks for reading!
Helpful Resources
- Google Cloud VMware Engine documentation
- Private cloud networking for Google Cloud VMware Engine Whitepaper
- Migrating VMware VMs using VMware HCX
- Google Cloud VMware Engine Logical Design Poster for Workload Mobility
- Cloud DNS
- Cloud Storage FUSE
- gcsfuse
- Installing Google Cloud SDK
- Cloud VPN documentation
- Tutorial: Deploy HA VPN with Terraform
- Cloud VPN Technologies
- Using third-party VPNs with Cloud VPN
- How to use multi-VPC networking in Google Cloud VMware Engine
- Google Cloud Platform Provider for Terraform
- My GCP Terraform Examples
You can find a hands-on lab for GCVE at https://labs.hol.vmware.com/ and searching for HOL-2179-01-ISM
Comments are powered by Disqus, which uses cookies.