Now that we have an SDDC running in Google Cloud VMware Engine, it is time to migrate some workloads into the cloud! VMware HCX will be the tool I use to migrate Virtual Machines to GCVE. If you recall from the first post in this series, HCX was included in our SDDC deployment, so there is no further configuration needed in GCVE for HCX. The GCVE docs cover installing and configuring the on-prem components for HCX, so I’m not going to cover those steps in this post. As with previous posts, I will be taking an “automation first” approach to configuring HCX with Terraform. All of the code referenced in this post is available at https://github.com/shamsway/gcp-terraform-examples in the gcve-hcx sub-directory.
Other posts in this series:
- Deploying a GCVE SDDC with HCX
- Connecting a VPC to GCVE
- Bastion Host Access with IAP
- Network and Connectivity Overview
- Common Networking Scenarios
Before we look at configuring HCX with Terraform, there are a few items to consider. The provider I’m using to configure HCX, adeleporte/hcx, is a community provider. It is not supported by VMware. It is also under active development, so you may run across a bug or some outdated documentation. In my testing of the provider, I have found that it works well for an environment with a single service mesh but needs some improvements to support environments with multiple service meshes.
Part of the beauty of open-source software is that anyone can contribute code. If you would like to submit an issue to track a bug, update documentation, or add new functionality, cruise over to the GitHub repo to get started.
HCX Configuration with Terraform
Configuring HCX involves configuring network profiles and a compute profile, which are then referenced in a service mesh configuration. The service mesh facilitates the migration of VMs to and from the cloud. The HCX documentation describes these components in detail, and I recommend reading through the user guide if you plan on performing a migration of any scale.
The example Terraform code linked at the beginning of the post will do the following:
- Create a site pairing between your on-premises data center and your GCVE SDDC
- Add two network profiles, one for management traffic and another for vMotion traffic. Network profiles for uplink and replication traffic can also be created, but in this example, I will use the management network for those functions.
- Create a compute profile consisting of the network profiles created, and other parameters specific to your environment, like the datastore in use.
- Create a service mesh between your on-prem data center and GCVE SDDC. This links the two compute profiles at each site for migration and sets other parameters, like the HCX features to enable.
- Extend a network from your on-prem data center into your GCVE SDDC.
After Terraform completes the configuration, you will be able to migrate VMs from your on-prem data center into your GCVE SDDC. To get started, clone the example repo with git clone https://github.com/shamsway/gcp-terraform-examples.git, then change to the gcve-hcx sub-directory. You will find these files:
main.tf– Contains the primary Terraform code to complete the steps mentioned abovevariables.tf– Defines the input variables that will be used inmain.tf
Let’s take a look at the code that makes up this example.
main.tf Contents
terraform {
  required_providers {
    hcx = {
      source = "adeleporte/hcx"
    }
  }
}
Unlike previous examples, this one does not start with a provider block. Instead, this terraform block will download and install the adeleporte/hcx provider from registry.terraform.io, which is a handy shortcut for installing community providers.
provider "hcx" {
  hcx = "https://your.hcx.url"

  admin_username = var.hcx_admin_username
  admin_password = var.hcx_admin_password

  username = var.hcx_username
  password = var.hcx_password
}
The provider block specifies the URL for your HCX appliance, along with admin credentials (those used to access the appliance management UI over port 9443) and user credentials for the standard HCX UI. During my testing, I had to use an IP address instead of an FQDN for my HCX appliance. Note that this example has the URL specified directly in the code instead of using a variable. You will need to edit main.tf to set this value, along with a few other values that you will see below.
resource "hcx_site_pairing" "gcve" {
  url      = "https://gcve.hcx.url"
  username = var.gcve_hcx_username
  password = var.gcve_hcx_password
}
The hcx_site_pairing resource creates a site pairing between your on-prem and GCVE-based HCX appliances. This allows both HCX appliances to exchange information about their local environments and is a prerequisite to creating the service mesh. I used the FQDN of the HCX server running in GCVE for the url parameter, but I had previously configured DNS resolution between my lab and my GCVE environment. You can find the IP and FQDN of your HCX server in GCVE by browsing to Resources > [Your SDDC] > vSphere Management Network.
resource "hcx_network_profile" "net_management_gcve" {
  site_pairing = hcx_site_pairing.gcve
  network_name = "Management network name"
  name         = "Management network profile name"
  mtu          = 1500

  ip_range {
    start_address = "172.17.10.10"
    end_address   = "172.17.10.13"
  }

  gateway       = "172.17.10.1"
  prefix_length = 24
  primary_dns   = "172.17.10.2"
  secondary_dns = "172.17.10.3"
  dns_suffix    = "yourcompany.biz"
}
This block and the block immediately following it add new network profiles to your local HCX server. Network profiles specify a local network to use for specific traffic (management, uplink, vMotion, or replication) as well as an IP range reserved for use by HCX appliances. For smaller deployments, it is OK to use one network profile for multiple traffic types. This example creates a management network profile, which will also be used for uplink and replication traffic, and another profile dedicated for vMotion.
resource "hcx_compute_profile" "compute_profile_1" {
  name       = "SJC-CP"
  datacenter = "San Jose"
  cluster    = "Compute Cluster"
  datastore  = "comp-vsanDatastore"
  depends_on = [
    hcx_network_profile.net_management_gcve, hcx_network_profile.net_vmotion_gcve
  ]

  management_network  = hcx_network_profile.net_management_gcve.id
  replication_network = hcx_network_profile.net_management_gcve.id
  uplink_network      = hcx_network_profile.net_management_gcve.id
  vmotion_network     = hcx_network_profile.net_vmotion_gcve.id
  dvs                 = "nsx-overlay-transportzone"

  service {
    name = "INTERCONNECT"
  }

  service {
    name = "WANOPT"
  }

  service {
    name = "VMOTION"
  }

  service {
    name = "BULK_MIGRATION"
  }

  service {
    name = "NETWORK_EXTENSION"
  }
}
The hcx_compute_profile resource defines the compute, storage, and networking components at the local site that will participate in a service mesh. Compute and storage settings are defined at the beginning of the block. The management profile previously created is also specified for the replication and uplink networks. Finally, the service statements define which HCX features are enabled for the compute profile. If you attempt to enable a feature that you are not licensed for, Terraform will return an error.
There are two things to note with this resource. First, the dvs parameter is not accurately named. It would be more accurate to name this parameter network_container or something similar. In this example, I am referencing an NSX transport zone instead of a DVS. This is a valid setup as long as you have NSX registered with your HCX server, so some work is needed to update this provider to reflect that capability. Second, I’ve added a depends_on statement. I noticed during my testing that this provider would occasionally attempt to remove resources out of order, which ultimately would cause terraform destroy to fail. Using the depends_on statement fixes this issue, but some additional logic will need to be added to the provider better understand resource dependencies. I’ve also added depends_on statements to the following blocks for the same reason.
resource "hcx_service_mesh" "service_mesh_1" {
  name                   = "Service Mesh Name"
  site_pairing           = hcx_site_pairing.gcve
  local_compute_profile  = hcx_compute_profile.compute_profile_1.name
  remote_compute_profile = "GCVE Compute Profile"
  depends_on = [ hcx_compute_profile.compute_profile_1 ]

  app_path_resiliency_enabled   = false
  tcp_flow_conditioning_enabled = false

  uplink_max_bandwidth = 10000

  service {
    name = "INTERCONNECT"
  }

  service {
    name = "WANOPT"
  }

  service {
    name = "VMOTION"
  }

  service {
    name = "BULK_MIGRATION"
  }

  service {
    name = "NETWORK_EXTENSION"
  }
}
The hcx_service_mesh resource is where the magic happens. This block creates the service mesh between your on-prem data center and your GCVE SDDC by deploying multiple appliances at both sites and building encrypted tunnels between them. Once this process is complete, you will be able to migrate VMs into GCVE. Notice that the configuration is relatively basic, referencing the site pairing and local compute profile configured by Terraform. You will need to know the name of the compute profile in GCVE, but if you are using the default configuration, it should be GCVE Compute Profile. Similar to the compute profile, the service parameters define which features are enabled on the service mesh. Typically, the services enabled in your compute profile should match the services enabled in your service mesh.
resource "hcx_l2_extension" "l2_extension_1" {
  site_pairing    = hcx_site_pairing.gcve
  service_mesh_id = hcx_service_mesh.service_mesh_1.id
  source_network  = "Name of local network to extend"
  network_type    = "NsxtSegment"
  depends_on = [ hcx_service_mesh.service_mesh_1 ]

  destination_t1 = "Tier1"
  gateway        = "192.168.10.1"
  netmask        = "255.255.255.0"
}
This final block is optional but helpful in testing a migration. This block extends a network from your data center into GCVE using HCX Network Extension. This example extends an NSX segment, but the hcx_l2_extension resource documentation provides the parameters needed to extend a DVS-based network. You will need to know the name of the tier 1 router in GCVE you wish to connect this network to.
Variables Used
The following input variables are required for this example:
hcx_admin_username: Username for on-prem HCX appliance management. Default value isadmin.hcx_admin_password: Password for on-prem HCX appliance managementhcx_username: Username for on-prem HCX instancehcx_password: Password for on-prem HCX instancegcve_hcx_username: Username for GCVE HCX instance. Default value is[email protected]gcve_hcx_password: Password for GCVE HCX instance
Using Environment Variables
You can use the following commands on macOS or Linux to provide these variable values via environment variables. This is a good practice when passing credentials to Terraform.
export TF_VAR_hcx_admin_username='admin'
export TF_VAR_hcx_admin_password='password'
export TF_VAR_hcx_username='[email protected]'
export TF_VAR_hcx_password='password'
export TF_VAR_gcve_hcx_username='[email protected]'
export TF_VAR_gcve_hcx_password='password'
You can use the unset commmand to remove set environment variables, if necessary.
Initializing and Running Terraform
See the README included in the example repo for the steps required to initialize and run Terraform. This is the same process as previous examples.
Final Thoughts
It feels good to finally be able to migrate some workloads into our GCVE environment! Admittedly, this example is a bit of a stretch and may not be useful for all HCX users. My team works heavily with HCX, and we are frequently standing up or removing an HCX service mesh for various environments. This provider will be a huge time saver for us and will be especially valuable once there are a few fixes and improvements. Configuring HCX via the UI is an excellent option for new users, but once you are standing up your tenth service mesh, it becomes apparent that using Terraform is much quicker than clicking through several dialogs. I also believe that seeing the HCX configuration represented in Terraform code provides an excellent overview of all of the configuration needed, and how the configuration of different components stack together like Legos to form a completed service mesh.
What about automating the actual migration of VMs? This example prepares our environment for migration, but automating VM migration is best suited for a different tool than Terraform. Luckily, there are plenty of HCX-specific cmdlets in PowerCLI. Check out these existing resources for some examples of using PowerCLI with HCX.
This blog series is approaching its conclusion, but in my next post I’ll dive into configuring some common network use cases, like exposing a VM to the internet and configuring a load balancer in GCVE.
Helpful Links
- Migrating VMware VMs using VMware HCX
- Google Cloud VMware Engine Overview Hands-on Lab, which includes HCX configuration.
- adeleporte/hcx community Terraform provider for HCX
- HCX Lab - Full HCX Connector configuration Terraform example
- hcx_site_pairing Resource
- hcx_network_profile Resource
- hcx_compute_profile Resource
- hcx_service_mesh Resource
- hcx_l2_extension Resource
- Getting Started with the PoweCLI HCX Module
- PowerCLI Example Scripts for HCX
Screenshots
Below are screenshots from HCX showing the results of running this Terraform example in my lab, for reference. I have modified the example code to match the configuration of my lab environment.
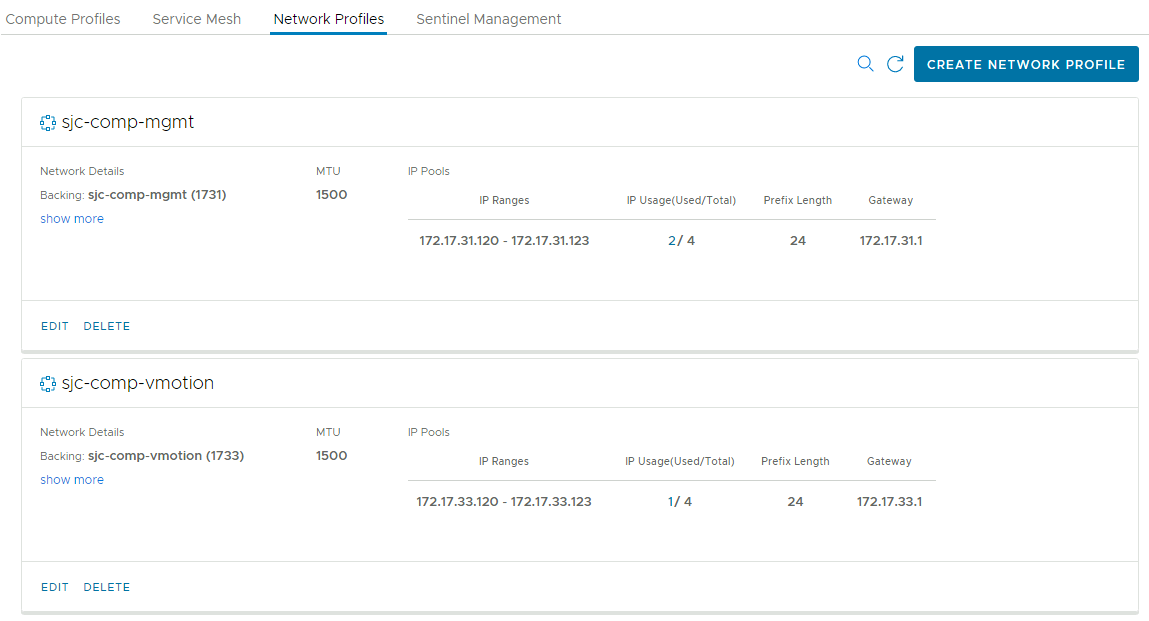 HCX Network Profiles
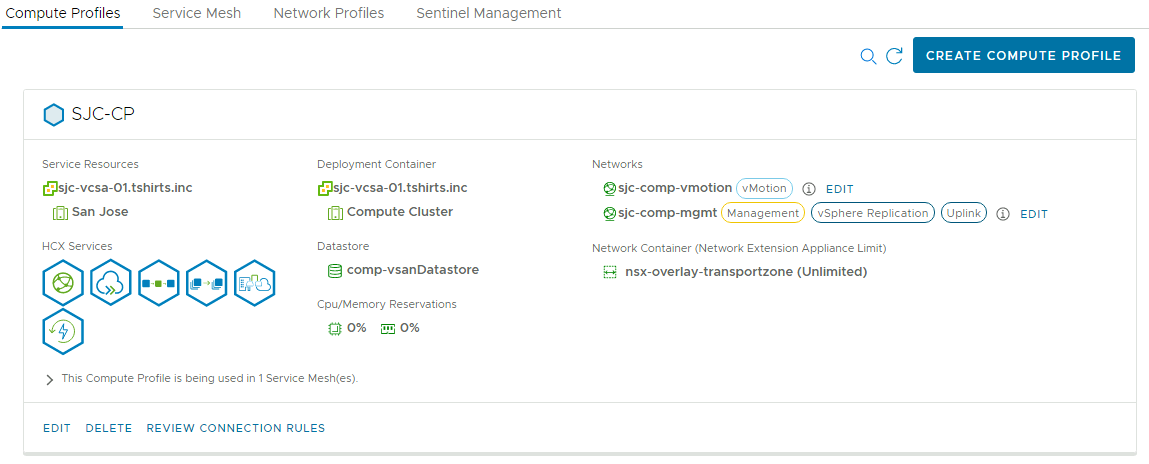 HCX Compute Profile
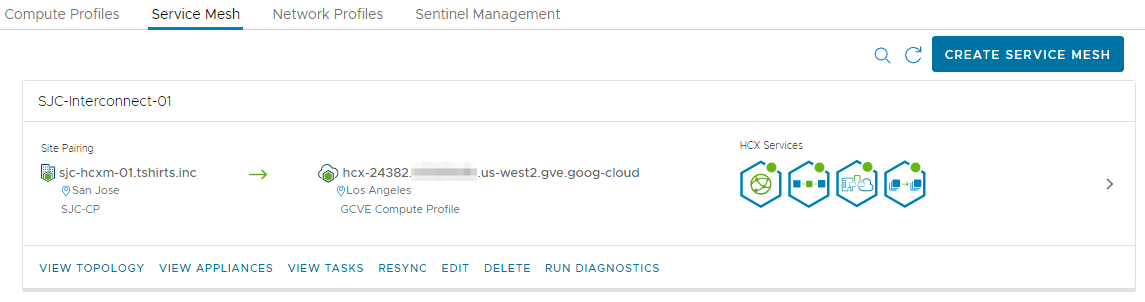 HCX Service Mesh
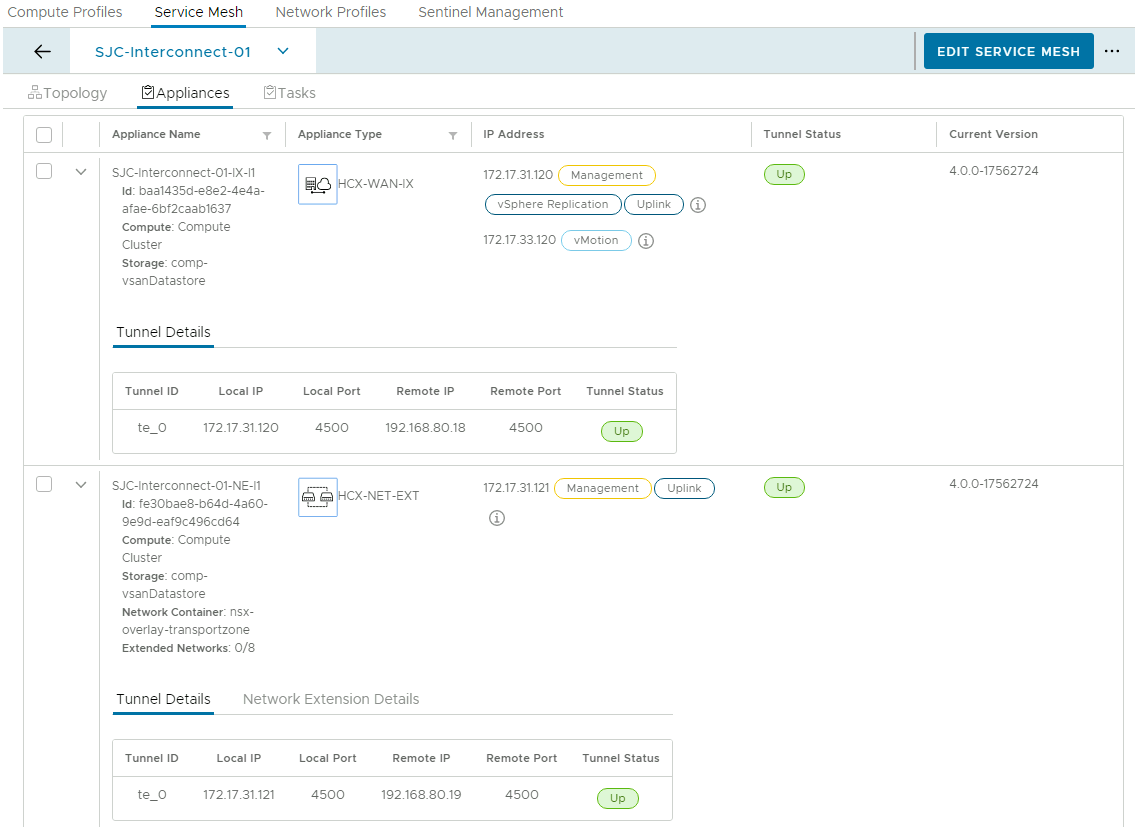 HCX Service Mesh Appliance Details
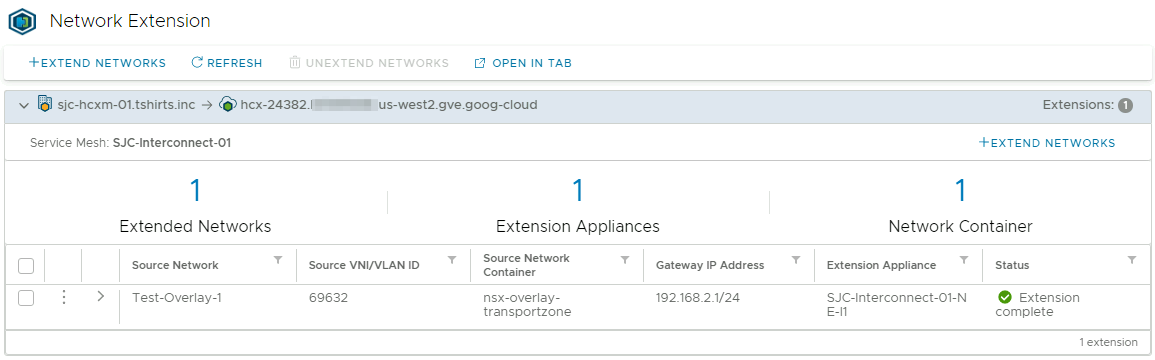 HCX Network Extension
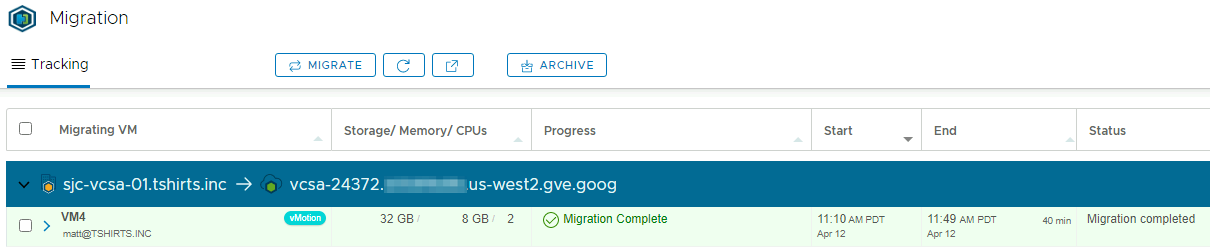 HCX vMotion Test
Comments are powered by Disqus, which uses cookies.